- PRO Courses Guides New Tech Help Pro Expert Videos About wikiHow Pro Upgrade Sign In
- EDIT Edit this Article
- EXPLORE Tech Help Pro About Us Random Article Quizzes Request a New Article Community Dashboard This Or That Game Popular Categories Arts and Entertainment Artwork Books Movies Computers and Electronics Computers Phone Skills Technology Hacks Health Men's Health Mental Health Women's Health Relationships Dating Love Relationship Issues Hobbies and Crafts Crafts Drawing Games Education & Communication Communication Skills Personal Development Studying Personal Care and Style Fashion Hair Care Personal Hygiene Youth Personal Care School Stuff Dating All Categories Arts and Entertainment Finance and Business Home and Garden Relationship Quizzes Cars & Other Vehicles Food and Entertaining Personal Care and Style Sports and Fitness Computers and Electronics Health Pets and Animals Travel Education & Communication Hobbies and Crafts Philosophy and Religion Work World Family Life Holidays and Traditions Relationships Youth
- Browse Articles
- Learn Something New
- Quizzes Hot
- This Or That Game New
- Train Your Brain
- Explore More
- Support wikiHow
- About wikiHow
- Log in / Sign up
- Hobbies and Crafts
- Paper Craft

How to Make a Collage
Last Updated: March 25, 2024 Fact Checked
This article was co-authored by Amy Guerrero . Amy Guerrero is an Arts and Crafts Specialist and the Owner of Sunshine Craft Co., a crafting studio based in Phoenix, Arizona. Amy specializes in macrame, DIY crafting, and teaching fiber arts. She offers monthly in-person and online workshops along with having developed a range of DIY craft kits for at-home projects. Amy holds a BS in Industrial Design from Philadelphia University. She worked as a graphic designer before starting her own business. Sunshine Craft Co. is a creative hub that offers a wide range of workshops, tools, and resources for any craft project to inspire creativity and community engagement. There are 18 references cited in this article, which can be found at the bottom of the page. This article has been fact-checked, ensuring the accuracy of any cited facts and confirming the authority of its sources. This article has been viewed 2,847,522 times.
Designing a Paper Collage

- There aren’t many limits to what you can do. For example, you could cut out small pieces of paper and arrange them so they form a bigger image.
- One option is to find an image that really speaks to you and design the rest of the collage around it.
- Search through magazines and newsprint for cut-outs. Newsprint adds a unique texture to a collage, but the ink may rub off on your fingers sometimes.
- Use photographs to capture a retro feel, but be careful about what you use. Make copies of your favorites to cut up instead of the originals.
- For something unique, find some old scraps of wallpaper. You can often get free sample swatches from home improvement stores and other places that sell wallpaper.

- Some background materials to consider include cardboard, cardstock, construction paper, and canvas. Anything thick and flat usually holds up well. You could even use something like a picture frame.
- Skip glossy paper like watercolor art paper. The material is more expensive and doesn’t hold up under glue as well.
- For example, you might cut a hole in a picture to expose the paper or another image placed underneath it.
- Wait until you’re satisfied with your design before you start gluing anything to the page. This will also give you extra time to find new materials in case you change your mind.
- Look for items around your home or take a walk through a nearby craft store. You are bound to find tons of interesting things to fit onto your collage!
- You could draw an animal on the paper and fill it in with paper or stamps. Another option is to create a mosaic out of small cuts of paper.
- Switch to a thick craft glue in order to secure embellishments like heavy beads and buttons. Look for some bottles of glue or rubber cement at your local craft store.
- Remember that not every piece has to be glued flat. Try crumpling or folding decorations to give your collage some extra flair.

- For a small collage, an hour is often enough drying time. If you think the glue still looks wet, give it more drying time to be sure.
- If you made a large collage, point a fan at it. The air blown on a low setting encourages the glue to dry a little faster.
Creating a Digital Collage
- For example, you might make a photo collage about puppies. Everyone loves looking at pictures of puppies. All you have to do is track down pictures you like and paste them together.
- You could work with a photo editing program like Photoshop if you have it and know how to use it.
- Visit your favorite social media site for posts you could save for your project.. Also, search for photos of themes you like, whether that’s cupcakes, video games, cars, or something else that inspires you.
- Save online images by right-clicking on them and selecting the “save as” option.
- While you can use more photos than this, adding too many may make the collage feel crowded. Using too few makes it feel empty.
- For example, you might select a series of pictures from a trip you took recently. Select pictures that show off your trip, what you saw, and the people who live there.
- Use the resizing and crop tools , for example, to cut the image down to a manageable size.
- Change the colors of the images to make your collage unique. For example, make photos look faded and grey to contrast them with bright text or images.
- Lower-resolution pictures tend to look blurry, but this depends on the size of the image and where you plan on displaying it.
- If you plan on posting your collage online, consider setting the images to a resolution of 72 pixels per inch (ppi). If you plan on printing it, set the resolution to 300 ppi.
- For example, add a title to your collage. You could let the pictures speak for themselves, but the title could add flair. You might add a title to a traveling collage to tell a viewer where you went and when you took the pictures.
- The printing paper you choose affects the final appearance of your collage. Choose a high-gloss paper to give it a shiny sheen. Use a matte-style paper to give it a dimmer, less colorful look.
Using Natural Materials in a Collage

- You don’t even have to have a theme if you don’t want one. You could arrange cool things on a page. Most collages, however, have themes to make them look more complete.
- Regular printer paper is not a good choice if you plan on gluing heavy items. If it feels thin, expect it to be too flimsy for your collage.
- For example, if you’re drawing a seascape, sketch the sand bed at the bottom of the page. Then, outline where you plan on making fish or adding details like shells.
- Simpler designs are better for small kids. If you don’t have a specific design in mind, let them have fun drawing whatever they like.

- Some examples of items to include are seashells, insect shells, flowers, leaves, and seeds.
- Many of these items are available for purchase at craft supply stores, but take a walk around your neighborhood. You may find something unique that gives your collage a special twist.

- Pressing is another way to preserve plants. Keep them weighed down between a piece of paper and a heavy book for at least 7 days.
- Objects like shells and rocks don’t really need to be heat-dried since they won’t rot. However, you can wash shells by boiling them in water for about 5 minutes, then soaking them for a week in clean, cold water.
- If you’re making something large and intricate, do this in small sections to prevent the glue from drying out before you add your decorations.
- Regular glue sticks and glue are usually too weak to support found items.
- This part can get a little messy, so keep a paper plate underneath your collage to collect the sand. Try to add small amounts of sand at a time to avoid using too much of it.
- Wood glue is great for preserving plants used in collages. Brush it over the plant to create a “glaze” capable of keeping it fresh and shiny for years.

Expert Q&A

- If the materials on the collage don’t stick even after you glue them, brush them with a diluted glue mixture. Combine about 3 parts water to 1 part PVA glue over the finished collage to seal it. Thanks Helpful 9 Not Helpful 3

- Take care when using scissors or glue. Supervise young children when handling dangerous tools. Thanks Helpful 5 Not Helpful 1
Things You'll Need
- Photo editing software
- Scanner for photos (optional)
- White glue or paste
- Scissors or a craft knife
- A base of stiff paper or cardstock
- Cut out images or letters
- Cardstock or other stiff paper
- Craft or wood glue
- Paper towels
- Shells, flowers, twigs, and other material
- Craft sand (optional)
- Paper plate (optional)
You Might Also Like

- ↑ Amy Guerrero. Arts & Crafts Specialist. Expert Interview. 9 October 2020.
- ↑ https://www.tate.org.uk/art/art-terms/c/collage
- ↑ https://arl.human.cornell.edu/PAGES_Delft/Collage_deeper.pdf
- ↑ https://www.dentonisd.org/cms/lib/TX21000245/Centricity/Domain/6555/Torn%20Paper%20CollageWEB.pdf
- ↑ https://emptyeasel.com/2011/06/20/go-one-step-beyond-painting-create-a-contemporary-collage/
- ↑ https://www.rookiemag.com/2012/03/collaging-for-beginners/
- ↑ https://www.moma.org/interactives/exhibitions/2014/matisse/the-cut-outs.html
- ↑ https://www.itsalwaysautumn.com/photo-letters-easy-picture-collage-craft.html
- ↑ https://www.happyfamilyart.com/art-lessons/mixed-media-art-lessons/tissue-paper-collage/
- ↑ https://www.rookiemag.com/2016/06/how-to-make-a-collage-in-photoshop/
- ↑ https://www.ravensbourne.ac.uk/asset-bucket/prod/2021-01/Digital%20collage%20for%20Adobe%20Illustrator.pdf
- ↑ https://support.office.com/en-ie/article/reduce-the-file-size-of-a-picture-in-microsoft-office-8db7211c-d958-457c-babd-194109eb9535
- ↑ http://www.first-school.ws/activities/artapp/collage.htm
- ↑ https://www.youtube.com/watch?v=ocEtwpcUpPg&feature=youtu.be&t=48
- ↑ https://www.youtube.com/watch?v=tp7m2A9Bv78
- ↑ https://www.youtube.com/watch?v=dyxA6wyvAR0&feature=youtu.be&t=22
- ↑ https://www.youtube.com/watch?v=AF-R4irTB2U&feature=youtu.be&t=19
- ↑ https://www.youtube.com/watch?v=ocEtwpcUpPg&feature=youtu.be&t=306
About This Article

To make a digital collage, look up a free photo editing website online. Or, you can download a free program, like Adobe Spark, and make your collage using that. You can even use a word processor, like Microsoft Word, if you're just looking to make a simple collage. For more design options, you might want to use a paid photo editing program, like Photoshop, instead. Whichever program you use, just upload your photos and use the design features to arrange the photos in your desired layout! To learn how to make a collage using paper and printed photographs, keep reading! Did this summary help you? Yes No
- Send fan mail to authors
Reader Success Stories
Jan 23, 2017
Did this article help you?

Feb 15, 2018
Jul 21, 2016
Renne Proulx
Jun 13, 2020
Sheina Pandacan
Dec 2, 2016

Featured Articles

Trending Articles

Watch Articles

- Terms of Use
- Privacy Policy
- Do Not Sell or Share My Info
- Not Selling Info
wikiHow Tech Help Pro:
Level up your tech skills and stay ahead of the curve
How to Make a Paper Collage

Introduction: How to Make a Paper Collage

Paper collage is a technique of an art production where the artwork is created using an assemblage of different forms and shapes using paper. These forms and shapes eventually create a whole image. In this instructable, I'll show you how to make your own paper collage. To create a paper collage you will need: 1. A board/canvas 2. Paint and/or coloring pencils (optional) 3. Pencils/markers/pens 4. Glue 5. Paintbrush 6. Magazine Paper 7. Ruler 8. Scissors (optional)
Step 1: Your Workplace

First, to create your paper collage, you need a place or something to put it on. Simply get a canvas board or even simpler, a sheet of wood.
Step 2: Your Image

You can't create a paper collage without having something to make. Pick any picture or image that you like and base it off of that. It could be anything (an animal, nature, etc.)
Step 3: The Grid

To properly transfer your image to your canvas/board, the best method is the grid method. You draw a grid on both your image and your canvas using your ruler and pen/pencil/marker.
Step 4: Transferring Your Image
Now that your grid is on both your image and canvas, it's time for you to transfer that image onto your canvas. Using your pencil, copy whatever is in a certain box on the grid of your image into the same box on the grid on your canvas. This gives the picture on the canvas an almost identical transfer from the original picture.
Step 5: Distinguish the Parts of You Image
Now that your picture is now on your canvas, use paint, coloring pencils, or simply write the name of the colors in their desired areas. This makes it easier to arrange the colors with the paper later on.
Step 6: Get the Paper

You now need to get some paper (preferably magazine paper). Find pages out of magazines that match the colors you are using and tear them up into small pieces. (This is where the scissors are optional depending on how you want your collage to come out. The scissors may make a cleaner cut but you may prefer the rough look tearing the paper by hand provides.)
Step 7: Make Your Canvas Sticky
Using a paintbrush, lightly spread layers of glue on your canvas. This is the only way your pieces of paper will stick to your canvas.
Step 8: Put It Together

When your canvas is still wet with glue place the pieces of paper in there desired places (by size and by color).
Step 9: Repeat
Continue to spread glue on your canvas and place pieces of paper in their desired places (steps 7 & 8).
Step 10: Wrap It Up
When finished placing your paper on your canvas and you have gotten your desired look, spread one last layer onto your piece. This flattens any bumpy or rising pieces of paper and makes it look smoother. Wait for it to dry hang your masterpiece.
Recommendations

Green Future Student Design Challenge

Books and Bookshelves Contest

Made with AI - Autodesk Design & Make - Student Contest

The Beginner’s Complete Guide to Collage Art
Collage art allows for an incredible range of creativity as it can utilize a variety of materials and mediums.
Most likely, you’ll have everything you already need at home! Honestly, all you need is paper and some sort of adhesive (like glue or tape) and you’re good to go.
Collage art is pretty much the least intimidating art medium ever. It’s great for beginning artists as it requires no technical skills whatsoever.
However, if you love drawing or painting, you can also incorporate that into your collage art!
Collage art is also great for accomplished artists as it can offer up brand new challenges. From construction paper cut-and-paste to surrealist magazine style of collage art, the possibilities are endless.
So what exactly is collage art? Collage art is, “a technique of composing a work of art by pasting on a single surface, various materials not normally associated with one another.”
This can include magazine images, newspaper clippings, photographs, movie tickets, basically anything and everything paper.
You can even explore mixed media collage art and add unique items like buttons, ribbons, or even flowers.
What’s included for this hobby of the month?
For this hobby of the month, we’ll explore a different technique of collage art each week. I’ll provide a wide range of ideas here to get you started and you can pick the technique that is most appealing to you!
Before we can start with collage art, you’ll need to get familiar with some materials and supplies you can use for this hobby.
Although you only really need paper and some adhesive, you always have the option to upgrade!
Collage Art Tools & Materials
Support for collage art.
The first thing you’ll need to create collage art is something on which to put your art.
This can include papers, cardboard, or even canvases. What you select is ultimately going to be based on a few parameters:
What do you want to do with the final product?
If you want to mount it on a wall, you might consider using something that provides high stability and support.
Canvases are great for this purpose. If you want to keep it tucked in a folder or binder, use something much thinner like watercolor paper.
Use a thicker variety of watercolor paper so it can withstand the weight of your adhesives and paper.
What materials do plan on using in your collage?
If you are planning on utilizing heavy objects, you’ll need something with strong support.
Try a mat board, Davey board, cardboard, hardboard, or even plywood for the really heavy stuff.
What adhesive do you plan on using ?
If you’re using tape, you can probably stick with watercolor paper, cardboard, or bristol paper.
If you’re using glue, you need to consider the thickness of the glue and whether the support will be able to withstand the layers of this adhesive.
I personally like hanging up my collage art, but I don’t necessarily need to stability of a stretched canvas on frames.
I love using these 8×10 flat canvases. They provide good support and I don’t have to worry about the amount of glue I apply.
I have the ability to hang these and they’re the perfect size for me. The best thing for me? They’re pretty damn affordable.
Adhesives for collage art
Another item you’ll need for collage art is an appropriate adhesive. You can use either tape or glue for your artwork but I would recommend glue for this.
Glue is definitely more long-lasting but it can be way messier than using tape.
There are tons of different glues available and you should be aware of the different characteristics that each one can offer.
Since I typically only work with paper, I like using Elmer’s 2-in-1 Dual Tip Glue Pen.
This is the same glue I used in my scrapbooking days. I like that there’s a flat surface tip for you to glide the glue across the paper but there’s also a small tip for more precise applications.
It also dries wrinkle-free on paper. It works well for me as a casual explorer in collage art for now.
Other glues I would consider are white glues like Mod Podge. You can find archival (good for long-lasting durable art) and non-archival glues in gloss and matte finishes and it works great as a sealant as well.
You can also consider polyvinyl acetate (PVA) all-purpose glues but it’s not archival. This is your typical white Elmer’s glue that you see commonly used in schools.
You can also use glue sticks but only pick higher quality, permanent ones.
The cheap school-grade glue sticks won’t be durable for your collage art. If that’s all you have in the house and you don’t want to invest in any other glues, glue sticks will work fine to get the job done.
If you are utilizing heavier objects on your collage, I would recommend more durable options like wood glue.
Other options would include acrylic mediums (can be used as both a glue AND a finish) or rubber-based adhesives (like rubber cement).
Whatever you use, just make sure that it’s strong enough to secure the materials that you’re using for your collage!
Cutting Tools for Collage Art
The scissors you have sitting on home is probably good enough to get started.
If you want to explore collage art on a deeper level, you may need more heavy-duty scissors for cutting heavier material like leather or cardboard.
If you need more precise scissors for detailed cutting, grab some fine-tip scissors.
If you want decorative edges in your clippings, buy some decorative-edge scissors at your local craft store. Adding fabric into your collage art? Try some fabric shears.
I’m not good with knives at all. I don’t use them unless I have to because I’m always bound to cut myself.
Knives are great for cutting a variety of materials. You can use large utility knives, craft knives or even desktop paper cutters.
Desktop paper cutters are perfect if you want straight lines in very precise measurements.
I love using this X-Acto knife set (pictured on right). It gives me pretty precise cuts for magazine clippings.
Materials for Collage Art
Need ideas on what type of materials you can use for collage art? Here’s a list of ideas!
Most of these can be found around the home but if you don’t have a lot of these items, try visiting your local recycling plant, secondhand stores, or libraries (for used book sales).
- Junk mail/flyers
- Old memorabilia like plane tickets, movie tickets, souvenir pamplets, etc.
- Photographs
- Decorative scrapbooking paper
- Gift wrapping paper
- Notebook paper
Want to add more than just paper and objects to your collage? Utilize these other mediums to add a flare to your collage!
- Watercolor paints
- Acrylic paints
- Colored pencils
Now that we’ve covered supplies, let’s see what types of collage art you can get into! Check out this list of collage art ideas !
1 thought on “The Beginner’s Complete Guide to Collage Art”
I collage 9×12 white envelopes and later use for mailing address labels or handmade envelopes that I make for people. They’re also great for saving special things you want to keep.
Leave a Comment Cancel reply
Save my name, email, and website in this browser for the next time I comment.
Privacy Policy
Home » Creative » Artsy
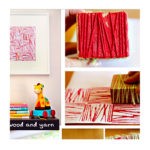
Make Paper Collage Art in 15 minutes
I am a paper hoarder. I have piles of paper of all kinds and sometimes I don’t want to use them.. I might need them later, right? Well, I decided today, it’s time to use those papers we love and make something else we can love even more. Collage art is really simple (so says I). There are no rules, you don’t need anything special.. you just need to be willing to try it. So here’s a great project for all of us – even those of you thinking you’re not artistic! We’re going to do this in 15 minutes or less, no kidding! If you want to spend more time, go with it, but don’t rack your brain or let yourself stumble into self critique mode, just go with it – quick!
This paper collage project is this month’s Craft Lightning project from Jen Goode: (in my best Ryan Secrest voice)

Grab a stack of paper scraps, a pad of coordinating paper, or whatever you hand. Pull out 3-8 sheets of different paper designs. It can be solid, patterned, or I like the double sided papers best because it’s super easy to see they coordinate with eachother.
The key to a good collage is making sure your designs feel comfortable together. That’s going to be a perspective all your own. Everyone likes different colors and different looks, so what you love, is uniquely your own. Go with it.
Materials you need:
- A Variety of paper
- Glue (I used hot glue)
- Scissors (optional)
If you love the paper I used as much as I do, look for Live in Color by Susan Weckesser. Love Love her beautiful art paper!
How to Make Your Own Paper Collage Art
- Start with a base for your art. You can use paper or cardboard, canvas or whatever you’d like. I started this Mini Art with a piece of paper about the size I wanted my finished piece to be.
- Cut or tear strips of paper. Make them different widths. Cut one side and tear the other. It’s up to you.
- Layer the paper in stripes on the base. Arrange until you like the look.
- Glue into place. I used hot glue because it dries almost instantly, I and love hot glue. Any craft glue will work just fine as long as it works well with paper.
- Add accent pieces, embellish your art to finish it off.
- Optional – make spacers to place in between paper layers to create some dimension in your art piece.
To make spacers:
Using cardstock, make a rolled tube. Glue in place. Cut the roll into little, equally sized, circles. Kind of like making a sushi roll and cutting into bite sized pieces of sushi :D.
The whole process is super quick! I think you’ll end up spending more time deciding on your papers than you will putting the whole thing together. This is also a great art project to do with the kids. Because there is no “it has to look like this” kind of expectation, it’s a great intro family art fun!

If you have more than 15 minutes, you can spend time adding extras. I made a larger version of this collage art with a monogram and a little text message. The whole Project, with paper picking took me about an hour… if I wasn’t stopping to take photos for you, it probably would have only taken about 30 minutes. You can add hand drawn art, gems, ribbons or whatever you’d like. I added a hand drawn capital L monogram to this art and the words “is for…” on separate paper pieces.

Tip to make your own monogram:
If you don’t want to hand draw your letters from scratch to use as monogram art, here’s a little cheat for you. Print out a single letter, sized to fill en entire sheet of paper. Cut the letter out, trace it on to a second sheet of paper and then add hand drawn lines to complete the look.

Paper collage art made with strips of paper is an easy art project that is also a lovely way to create handmade cards or gifts for others. I think I need to make some teacher thank you cards now… what are you going to create?
Related Posts You Might Like:
- xTool F1 Portable RI and Diode Laser Engraver - Get…
- Personalized Gift Ideas to Make with Your Cricut
- 50 Tips and Life Lessons I Learned at Affiliate Summit

About Jen Goode
Jen is Passionate about Creativity. She is the owner and "doodle in charge" of JGoode Designs, a Denver based design studio. She is an illustrator, mixed media artist and creative lifestyle blogger. Jen has been a creative professional since 1998 but says she's been an artist since she was old enough to eat glue.
Get tutorials, free file downloads and project ideas right in your email.
10 thoughts on “Make Paper Collage Art in 15 minutes”
That was a very nice tutorial, I tried it and the outcome was oustanding!! I hope I will see more of these tutorials!
I love how you used my paper sweet girl! BEAUTIFUL! xoxo
Thank you so much for making such beautiful papers Susan!
This is great! I’m going to start making some collages cards for Christmas. If I start now I’ll finish by November right?
Absolutely! I bet you get a ton more finished before you expect. Thank you Ashley!
I LOVE THIS!!!
This would make gorgeous art for any room! Thanks for joining in!
Leave a Comment Cancel reply
Save my name, email, and website in this browser for the next time I comment.

Pink Spark Studio
Make your own collage paper
in Art Journal , Mixed Media on 01/12/20
Sharing is caring!
This post contains affiliate links. We may earn money or products contained in this post. Please click my disclosure policy to learn more.
DIY Collage Paper
If you make mixed media art of any type chances are you’ve bought collage paper. I have a bunch stored under my desk. However, this is something you can do without. I decided to not buy anymore paper for collages for a little bit. Instead, I decided to make my own collage paper. This is a fun challenge. I’m sure I’ll end up buying more paper. However, it will be because I want to and not because I have to.

The first time I did this was back in the year 2002 while I was studying with an accomplished artist. He was always having me push my limits. Fast forward many years and I had forgotten all about this exercise until I found I didn’t like any collage paper on hand. Like they say, necessity is the mother of invention, that and Pinterest. After spending time looking at other beautiful collages and mixed media, I decided to make my own collage paper, again.
Here are some benefits:
- Cost Efficient
- One of a kind
- Helps improve creativity
Saving money is always a plus for an artist. There are so many supplies I’m always aching to buy, saving money in other areas helps feed my addition to buy more supplies. It’s an accomplishment to lower your waste. It’s good for the environment, saves room in your trash can and saves money in your wallet.
One of the best aspects is that nobody else will have the same paper. You can get as wild as you want and make one of a kind creations. You can even take it a step further and scan and print your collage papers so you can keep a theme going for your mixed media creations.
The activity of creating collage papers helps stimulate and deepen your creativity. You can play around with new color combos, making stencil, designs and mark making techniques. Endless possibilities.
Lets make some collage paper
You can make collage paper is a variety of paper. I’ll be making collage paper with the following paper:
- Simple Printer Paper
- Mixed Media Paper
- Cheaper Watercolor paper
Art Supplies
Acrylic paint is always a good choice. You can don’t even have to use fancy acrylic paint for this process. You can use the very cost affordable craft paint. I also love fluid acrylic paint. It has a liquid consistency and is fun to drip and splatter. The colors are all very vibrant and add a great splash of color to any page.
Acrylic paints work very well with stencils.
Here are some paints I used for the examples:
- Jane Davenport Acrylics
- FolkArt Craft Acrylic Paint
- Apple Barrel Craft Acrylic Paint
Watercolor paints can make beautiful backgrounds and are easy to layer on. You can use your cheaper watercolor for your collages. Or go wild and use the super expensive stuff. Whatever your art intuition is telling you.
Gesso is a great tool. It can prime your surface for paint, you can mix it with paint and inks, and it can also be used to mute your colors and bring your composition together.
Painting techniques
Here I will talk about different painting techniques to use for your collage papers. Then I’ll talk about combining these paint techniques to create the actually collage papers.

I love to splatter my past onto surfaces. There are a couple or ways to splatter so you can still control the look of the paint and where it goes.
I like to add a little water to acrylic paint to get a good thin constancy. I then take my brush and load it with some paint and then tap it on another brush so the paint splatter of the brush onto the page. You can also use a toothbrush to get get smaller splatters.
Loose Strokes

Loose, drippy paint strokes can bring energy and excitement to your page. I take the acrylic paint mixed with some water, load my brush and loosely swish it across the page. Don’t plan, just let the brush lead you.
Watercolor washes

You can make smooth and beautiful graded washes that blend two colors, flat washes or uneven, fun and messy loose washes.
You can pretty much use any paper. Never limit yourself. I’ve seen some of the most beautiful art journals created in a regular notebook. The trick is finding something that jives with you, that inspires you.
There are endless ways to make collage paper. This is just a few ways. You can copy it, or use it as a spring board to draw inspiration from.
Save your paint and paper
When you are art journaling you can often end up with excess paint. Instead of throwing out the paint take your brush and clean the paint off on a black piece of paper. If you want to test paint test it on a piece of paper and save the paper. These papers with excess paint and test samples can later be turned into collage paper. The paint that is already on them will give interesting an unexpected marks for further use.
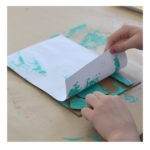
Making Collage Paper
Collage Paper with stencils

Stencils are a great way to add design and interest to your collage papers. I created these stencil patterns on aper that already had been painted on. I also overlapped the stencils. I wanted to be a free flowing design and not orderly if that makes sense.
1.) Place the stencil where you want it and apply paint. Remove stencil and admire the patter.
2.) Apply paint, place down stencil, tips away paint where the stencil is to create almost a negative space look. Remove stencil and admire.
You can layer stencils, apply stencils wherever on the page with out any planning. Or, you can make your stencil the focus point on the page.
Collage Paper with Ephemera
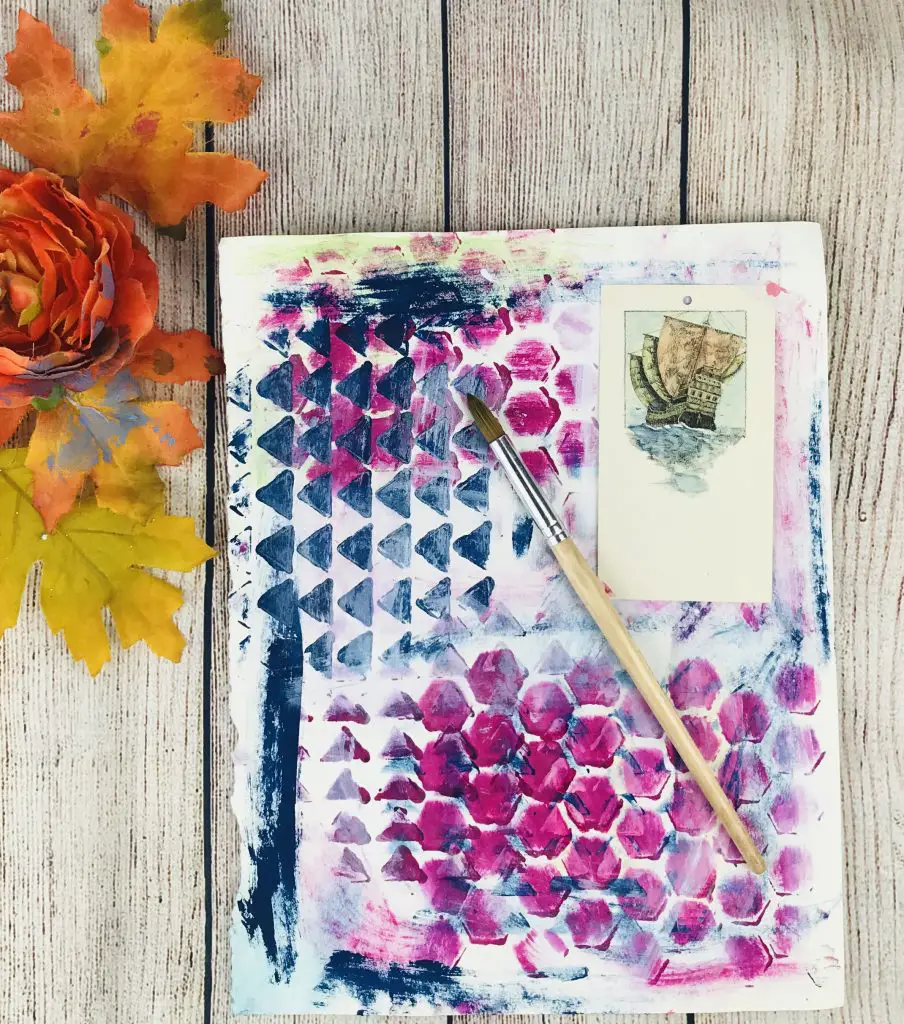
When making collage paper you can do anything you want. I love to add ephemera to my collage paper to add an even more unique look.
Things I use for my paper:
- Books pages
- Magazine clippings
- Saved clippings
You can add these elements to the base layer or on the top layer. Ephemera can work combined with the above techniques.
I like to use a little ink or gesso over ephemera to help blend it with the rest of the page.
Collage Paper with Stamps

A few stamps can go a long way. You can create a focal point by repeating a pattern. You can use face or people stamps. There is s tamps for anything you could be interested in.
Collage Paper with Ink

I love ink. It’s bright and vibran and I love the liquid texture. One thing to keep in mind is that ink is not lightfast. This means the color will eventually fade, it can even completely change it’s hue. I still use it. You can read how I dyed my mermaid paper here .
Print and Scan your Collage Paper
You can easily scan your collage paper and save it on your computer or on a flash drive. I recommend flash drives. I like to have a back up plan. Then, you can always go back and print out your handmade collage paper whenever you want to. It’s a nice accomplishment to be able to go and print off art supplies that you made. Congratulations! I hope you enjoy your work.
Show Me Your Art!
I’d love to see your art. Please come and join me in my Facebook group and share your art and ask any questions you may have!
More Art Tutorials
If you love art tutorials than you should try Skillshare . I’m on Skillshare all the time taking classes. Skillshare is basically a streaming service for classes. They have art classes, tech classes, and so many more.
You can get a free trial absolutely FREE with this link ! That’s how I got started. You can read more on my Favorite Skillshare watercolor classes here . This is a risk free way to try the service. I have tried many similar services and so far Skillshare is the only one I try like and actually use and benefit from. I adore it. It’s a great way to get myself out of a creative funk on those blue days, too.

July 1, 2020 at 7:30 am
Just the article I was looking for. Very informative, thank you!
Leave a Reply Cancel reply
Your email address will not be published. Required fields are marked *
Disclosure Policy
Privacy Policy
Terms and Conditions
As an Amazon Affiliate I earn from qualifying purchases.
Privacy Overview

6 Paper Collage Techniques to Try
April 25, 2014 By Sara Barnes filed under Art Blog , Paper Crafts Blog .
French artist Henri Matisse once described paper collage as “painting with scissors.” Sounds fun, right? If you’re new to paper crafting or curious about artistic collage, experimenting with these six techniques is a great place to start.
1. Cut Out Shapes From Painted Pieces of Paper

Fans of Eric Carle — and their parents! — will recognize this technique from The Very Hungry Caterpillar . Simply paint all over your paper, let it dry and cut out shapes. Experiment with placing your shapes to make animals, plants, or whatever you like. Once you find a design you love, use glue to secure the shapes to your background.
2. Combine “Junk” Papers for an Interesting Background
Let’s be real: you’ve probably never given security envelopes or grid paper a second thought. But these boring scraps can actually help make a totally cool collage! Simply cut ’em up, glue ’em to your paper and Modge Podge over the whole thing. Then let it dry and pretty up your collage with drawings or paint.
3. Try Textured Paper with Photographs
Photographs can make for some funny, expressive or even sentimental collages. Set the stage with a textured paper background, then layer on shots cut from magazines. Need more direction? Here’s a challenge: use this technique to illustrate one of your recent dreams!
4. Use Embroidery Thread and Fabric
Why stop at paper? Scraps of fabric and embroidery thread make great collage elements. Get as crazy as you want combining different materials. You can even use a sewing machine to stitch the fabric to the paper if you want!
5. Stamp on a Mixed-Media Background
Making a stamp is easier than you think — and while we love specialized stamping techniques, you can do the job with something as simple as a potato if you want! Just cut it in half and draw a design (big, bold shapes work best). Then carve away whatever areas you don’t want to be printed, dip that spud in paint and stamp onto a cool collage background.
6. Weave Paper Strips for Major Texture
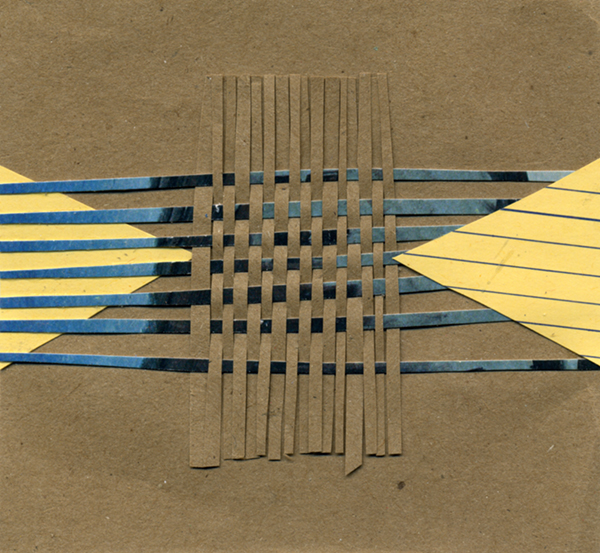
There are no rules here. Just cut out strips of different papers and get weaving! We love this approach for unexpected texture on scrapbook pages or greeting cards.
Share tips, start a discussion or ask one of our experts or other students a question.
Already a member? Sign in
5 Responses to “6 Paper Collage Techniques to Try”
Interesting
What is your technique for gluing without getting any air bubbles ?
My cutouts do not stay stuck to the canvas panels I am using. I am using glue sticks. Any ideas for getting the paper to stick to the panels.
Tnx it really helped me
Tnx it rea helped me

Premium Membership
Unlock exclusive member content from our industry experts.
- 24/7 Access to Over 2,000 Premium Classes and Hundreds of Instructional Videos Across 20+ Categories
- Extensive Library of Downloadable Patterns and Recipes
- Stream and Download Classes Anywhere with the Craftsy App
- Share Your Membership with up to 3 Friends or Family Members
- Access to Ask the Expert Program
- Admission to Exclusive LIVE Streaming Virtual Events
- 2 Full-Length Classes to Keep in Your Account for Life
Gold Membership
Get everything included in Premium plus exclusive Gold Membership benefits.
- Share your Membership with up to 3 friends or family members
- 8 Full-Length Classes of Your Choice to Keep in Your Account for Life
- 10 Patterns, Guides, or Recipes of Your choice to Download to Your Devices
- 20% off Purchase-to-Own Classes in the Craftsy Shop (Select Classes Only)
- Exclusive GOLD LIVE Virtual Events
Username or email *
Remember me
Lost your password?
Privacy Policy

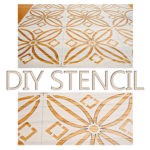
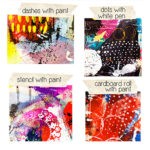
10 Ways to Make Your Own Collage Papers
1) nine watercolor techniques.
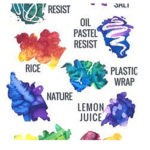
2) Rubber Cement Resist
3) Create Stencils with a Glue Gun
4) DIY Printmaking
5) More DIY Printmaking
6) PullString Art

7) Bleeding Tissue Paper Art

8) Create Your Own Stencils
9) Printmaking with Cardboard
10) Create Pattern
I can’t wait to try out the rubber cement and the pull string. What about you? Are you inspired to try any of them?

Subscribe to the Newsletter
& get the guide to
14 Things Good Artists Understand
Some links contained within this site are affiliate links, meaning, at no additional cost to you, I will earn a commission if you click through and make a purchase. Rest assured, I never recommend a product that I don’t believe in.
Search Artful Pursuits
5 comments . leave new.

These are too fun! I’m going to have to do the rubber cement one. I even know where my rubber cement is! Thanks for sharing these tips and tricks!

Let me know how it turns out. I want to try that one out, too!

Wow, these are awesome! Thanks so much for compiling this list. I’m inspired!

I have bookmarked this for play! So many great ideas in the list, thank you.

So many cool tips! Thank you for sharing.
P.S. I love Alisa Burke, too! Her designs are so bright and happy making!
Leave a Reply Cancel reply
Your email address will not be published. Required fields are marked *
Check here if you want to receive freebies and my monthly newsletter.
Post Comment
This site uses Akismet to reduce spam. Learn how your comment data is processed .
Similar Posts
Summer Art Journal Page and Prompts

Gelli Plate Leaf Prints

Inspiration Gathering Challenge

5 Free, Helpful Phone Apps for Artists
Get the free guide on 14 things good artists understand.
Plus receive the monthly newsletter full of information, tutorials, DIY ideas, and freebies.
Art Journaling & Mixed Media Art
by Aisling D'Art

Torn-Paper Collages – How-to video
Purchases made through my links help support this website, at no additional cost to you. Details .
Torn-paper collages are among my favorite ways to illustrate an artist’s journal.
I’ve been creating them for over 20 years now, and I never seem to get tired of them. In fact, two walls in our living room are a mini-museum of my favorite torn-paper collages. (People who visit us can be overwhelmed. It’s like they just want to stand and gawk at the art, undisturbed, for at least 20 – 30 minutes.)
Here’s how to create your own.
Steps to create a torn-paper collage
1. gather collage supplies..
All you really need are some pictures, something to use as glue, and something to support your collage, like a piece of paper.
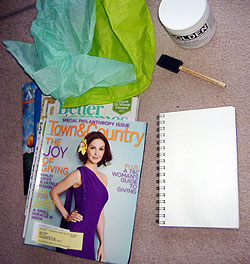
More details:
For pictures, words & phrases
– Magazines, newspapers, printed materials, junk mail
I especially like fashion, travel and nature magazines for photos. “W” magazine is great for huge, almost surreal images, as well as great words & phrases. “Town & Country” magazine offers a nice mix of fashion, travel, home & garden photos, as well as yummy ads.
If I’m going to sell the finished work, I’m careful about using magazines such as National Geographic. Though their pictures are gorgeous, they have a reputation for being difficult about copyright issues.
Here’s one guideline for using otherwise-copyrighted images: Some Questions About Fair Use . They give a good example of “transformative” artwork… and that’s the kind of collage I create.
For words and phrases, I like health, fitness, religious and New Age magazines, as well as junk mail. That includes the envelopes, which are often better than whatever’s enclosed in it.
I find free magazines at public libraries and sometimes at laundromats (ask if they’re ready to get rid of some of them).
Adhesives and glues for collage art
Previously, I was using Golden Gel Medium (Soft Gel – gloss) with a sponge brush. (That’s what was in my video. I no longer recommend that as an adhesive. It makes the paper buckle and bulge unnecessarily.)

Now, I use YES! Paste . For my work, it’s absolutely perfect, with minimal buckling and puckering, and the ability to reposition the image… for at least a few minutes.
Even better, a jar seems to last forever.
When I use a sponge brush, I rinse it out completely as soon as I’m finished with it. I can usually use the same sponge brush for a week before it starts to fall apart.
When I’m applying the adhesive, I use an old phone book or junk mail underneath my work.
Support for your collage
Anything can support your collage. I generally use a regular spiral-bound sketchbook for my daily collages. However, for this one (“Uncompromised’), I used a file folder. I’m not sure why; it seemed like the right choice.
You could use poster board, canvas, wood, or almost any surface that will accept glue.
(Some dishes or tiles work well with collages, but others don’t. Test different materials and adhesives to see what works for you.)
Collage embellishments
In the past – around 2000 – I used a lot of gold leaf and glitter, but that was a personal preference. Almost anything that you can glue to a surface can be used as an embellishment.
2. Select images and words or phrases.
Go quickly through your materials, and – without much thought – choose images, words & phrases that appeal to you. Tear out the entire page and set it aside.
Tip: If you like more than one element on a page, separate them. Otherwise, it’s easy to forget that you were going to use more than one item from a single page.
I often select a word or phrase early in this process. In this case, I chose “Uncompromised” quickly. The word “promise” is in red in it, and I realized (light bulb realization) that when I compromise, I’m breaking a promise to myself or to others. Even if it’s just small and unspoken, it’s still a betrayal (big or little) of an ideal that I held or aspired to. That’s a concept worth examining, as I work on daily priorities.
Remember that you can use a word or phrase from a sentence. I chose “you deserve” from a laxative ad!

When you feel pleased with your collection of pages, or when you have a stack of about ten pages, pause and begin working with them.
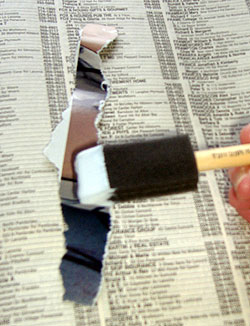
3. Tear the images in the approximate size, and then to the exact size.
If a page is really large, it can be more difficult to tear out the precise element that I want. So, I tear the page around the general area of the element, and then tear more exactly.
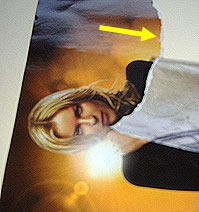
When I’m making the final tear, I try to tear it all in one go, not inching along, a little at a time. A smooth tear usually looks nicer, unless you have a specific reason for a very jagged edge.
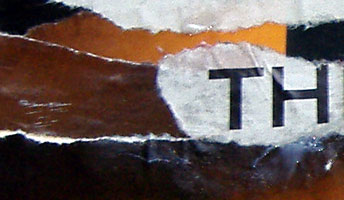
Also, when you tear the magazine page, there will be a white edge in one direction of the tear. (The yellow arrow points to it.) I like to work with either all white-edged images, or keep all of my images without white edges.
4. Apply adhesive to the back of the image.
This is going to be a little messy… or even a lot messy. Revel in it!
I use a sponge brush. Some people use their fingers or a regular brush.
I keep a damp rag or paper towel next to me, to clean glue off my fingers as I work. (I also wash my brushes thoroughly, as soon as I’ve completed my work.)
Work with something underneath the image, so you can cover the back of the image with adhesive.
If the adhesive is too thick, it can be lumpy underneath the image. If the adhesive is applied in a really thin layer, it can dry too quickly. However, as long as some of it sticks to the collage, that can be enough.
If it turns out lumpy, you can use an iron (there are special irons made for this, too) — with some sort of release paper between the collage and the iron, so the iron doesn’t get all gooey from the melting medium — and the heat softens & reactivates the adhesive. So, even dried adhesive can be reactivated and it’ll suddenly adhere the entire image to whatever’s underneath it. I only do this when the collage is nearly completed – before I apply any glitter or gold leaf – if there’s clearly a problem where part of the collage didn’t adhere correctly.
Keep in mind that your lower layers (and at least some of their edges) will be covered by later additions to the collage. So, how they look may not matter very much.
5. Place the image where you want it to be, in your collage.
Try to place it exactly where you want it to be, or at least fairly close. If you lift, stretch, or drag a piece of magazine paper, it can stretch and look a little odd in your final work.
If your collage element seems to bubble, it’s okay to pat it flat, but don’t try to smooth it. (I learned that from collage artist Claudine Hellmuth .)
If you brush it or rub it with your fingers to smooth it, it’ll stretch the paper and the finished result might be disappointing.
Bubbled paper seems to shrink back to shape was the adhesive dries, or at least some papers will do that. So, if you’re going to put something over the bubbled piece, let the bubbled part dry, first. It might flatten out on its own.
6. Keep working. Build up more layers. Tear more images as you work, if you need more images.
I usually tear out the first three or four images that I’m going to work with, and then start building the collage.
When I’m happy with them, or if I decide to add another image that I haven’t torn out yet, I pause and tear out what I’ll need next.
If I have a massive pile of torn paper – good stuff and paper that I may (or may not) use – it can become confusing.

7. Continue to build your collage.
Remember that the first layers are the background. As you add layers, they’ll be on top. (It’s amazingly easy to forget this, sometimes.)
The focal point (or points) of your collage should probably be on top. The leading areas tend to attract the attention of the viewer.
However, it’s okay to tuck little surprises in the lower layers, for the viewer to “discover” as he or she explores the collage.
Also, don’t despair if your collage looks messy. Some will be more messy than others. It’s okay.
Here’s a close-up of one area on this morning’s collage.
Here’s what you need to know if you make a “mistake.”
1. Milky areas will probably dry clear.
2. If the paper looks translucent in some areas (like right above the letter T in the photo above), they’ll probably turn opaque when the adhesive dries.
3. Anything that looks weird when the collage is nearly finished, can be covered with embellishments (glitter, gold leaf, threads, pieces of mica, paint, etc.) or you can cover it with another image or phrase.
It’s okay to change your mind.
For this collage, I’d selected a great image of a model looking in one direction. However, I discovered an even better photo on the back of it: Mulawi children in colorful, traditional clothing.
So, allow for serendipity as you work.
8. Keep building your collage until you’re happy with it.
It’s okay to take your time. It’s also okay to rush through this in a flurry of creativity.
You can start the collage, walk away from it, and finish it later in the day, or the next day, or the next week!
Tip: When you think to yourself, “I think this is nearly finished,” it’s probably finished. Stop! Take a break, and then take a fresh look at it.
It’s better to stop too early than take the work too far.
9. Consider adding embellishments.
I love embellishments, but you don’t have to add any at all. Every artist has his or her own style.
Embellishments can include things like:
- Glitter, tinsel, gold leaf (or copper leaf, etc.), feathers, or ribbon.
- Tissue paper (it may remain translucent if you use gel medium over and underneath that layer).
- Thread, glued on or stitched on.
- Beads, mica, sand, pieces of glass.
- Paint, oil pastels, stencils, rubber stamp art.
You can even embed something that plays a tune or says something (like in greeting cards) in your collage, for people to press.
The possibilities are unlimited.
10. (Optional) Finish with a coat of gel medium or other sealer.
After the collage is fully dry, you can seal it with a thin coat of gel medium. Well, maybe. It might make the paper buckle.
And really, it’s not necessary. I mean, yes, it will give the collage a uniform level of gloss (or a uniformly matte finish, if you used a matte gel medium).
It might also protect the collage from dust and damage, if you want to leave it “as is” instead of displaying it under glass.
Tip: If you’re using this in an artist’s journal – such as a spiral-bound sketchpad – place a piece of wax paper between the collage and the facing page. That will prevent the pages from sticking together.
My finished collage
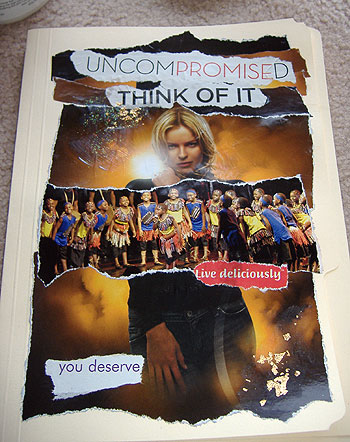
Though I could probably explain all of the elements, it’s true that “a picture is worth a thousand words.”
Basically, this is about re-evaluating compromises… things that I decided were okay, short-term, as a step to a more important goal. For me, it’s easy for those to become long-term issues.
For me, the image of the happy children in colorful clothing is important. It’s how joyous and self-expressive we all can be.
And yes, we all deserve to live deliciously, savoring every moment!
Here’s the YouTube video. It’s only four minutes, so it’s a bit of a whirlwind. And remember: I’m now using Yes! Paste , not gel medium.
- Wax Paper and Artists Journals
- Art Journaling with Mixed-Media Collage – Tips for Beginners
- How to Collage in Your Art Journals – 2008 Art Journaling Update
3 thoughts on “ Torn-Paper Collages – How-to video ”
Oh! I love this technique. My mom has used it for years. I have done it forever, but never like seeing a professional doing it. It is uplifting jijijiji 🙂
- Pingback: Tweets that mention Torn-Paper Collages - How-to video | Aisling.net -- Topsy.com
Valuable info. Lucky me I found your site by accident, I bookmarked it.
Leave a Reply
Your email address will not be published. Required fields are marked *
IMAGES
VIDEO
COMMENTS
Learn the basics of making a collage in this tutorial. You will learn what materials you can use, how to put it together, and some simple composition tips. ...
how to make easy paper collage landscape village scenery. paper collage art techniques or tutorial at home work.- Materials Used -- Glue - https://amzn.to/2Z...
Collage with me! ️ ️ ️ ️ ️If you find my videos helpful, consider a donation via PayPal. Donating will help me spend more time to art and sharing!https://www...
Paint (optional) — Depending on how you plan to form your collage, you may want to have some paint handy. Acrylic Matte Medium (optional) — This acrylic medium has two uses helpful for collage. It can be used to adhere paper onto other surfaces (like Modge Podge )—although it is nowhere near as sticky. Another use is a primer for painting.
Use the resizing and crop tools, for example, to cut the image down to a manageable size. Change the colors of the images to make your collage unique. For example, make photos look faded and grey to contrast them with bright text or images. 6. Change the resolution of all the images to match one another.
With scissors, cut the paper into different shapes and fragments. You can arrange the pieces of paper on the page before gluing them down, or you can cut out shapes and glue them as you move along. Layer the paper where needed, and peel back layers when needed. To make the collage process more flexible, use an acid free glue stick.
These forms and shapes eventually create a whole image. In this instructable, I'll show you how to make your own paper collage. To create a paper collage you will need: 1. A board/canvas. 2. Paint and/or coloring pencils (optional) 3. Pencils/markers/pens.
Collage art is, "a technique of composing a work of art by pasting on a single surface, various materials not normally associated with one another.". This can include magazine images, newspaper clippings, photographs, movie tickets, basically anything and everything paper. You can even explore mixed media collage art and add unique items ...
Make them different widths. Cut one side and tear the other. It's up to you. Layer the paper in stripes on the base. Arrange until you like the look. Glue into place. I used hot glue because it dries almost instantly, I and love hot glue. Any craft glue will work just fine as long as it works well with paper.
#papercollage #tornpapercollage #artinspiration #mixedmediaart This is a tutorial on torn paper collage, step by step, using gelli prints. Recently I was on ...
Remove stencil and admire the patter. 2.) Apply paint, place down stencil, tips away paint where the stencil is to create almost a negative space look. Remove stencil and admire. You can layer stencils, apply stencils wherever on the page with out any planning. Or, you can make your stencil the focus point on the page.
Simply cut 'em up, glue 'em to your paper and Modge Podge over the whole thing. Then let it dry and pretty up your collage with drawings or paint. 3. Try Textured Paper with Photographs. Photographs can make for some funny, expressive or even sentimental collages. Set the stage with a textured paper background, then layer on shots cut from ...
It doesn't have to be board. You can use a piece of card instead but you will need paper glue. Remember you can use anything to create your collage. Pictures from magazines, old family photos or ...
Betsy Dillard Stroud | Runtime (9 min) Put a personal touch on collage paper by making your own! Making your own collage paper is easier than you think! In this video, Betsy Dillard Stroud shares her technique for using newspaper, gesso, and stamps to create sheets of collage paper perfect for incorporating into your artwork. Give it a try!
Turn your photos into a beautiful video collage. Become a better storyteller by visually sharing your precious moments. Beautifully thread your favorite clips and photos together (opens in a new tab or window) to make them extraordinary in a video collage. It doesn't matter if it's as cliché as featuring your new skincare routine or as intimate as sharing your fun captures of an out-of ...
9) Printmaking with Cardboard. Barbara Rucci recently posted a cute tutorial for kids to create their own collagraphy, a basic a method of printmaking where collage material is glued onto a board to create a relief surface. It might look like kids play on her blog, but this is a fun, free way to create stamps which you can then use to create ...
In this video I demonstrate and explain how I create colorful collage paper out of scratch paper from other projects and doodles. In Part 2 (https://youtu.be...
Welcome! This blog post features a guided tutorial of how to create a geometric, Bauhaus-inspired paper collage. Prior to beginning, it is helpful to learn more about the Bauhaus art movement.Some of the key characteristics of Bauhaus art includes (1) simple, geometric shapes, (2) basic color schemes, and (3) asymmetrical balance.This activity challenges artists to depict these 3 ...
Collage 'Road Trip'. 2. Match textures. I try to only use materials that have the same texture in one collage. So I would never use a vintage image on thin paper with something that I cut out of a thicker catalogue. To me, it will make it stand out too much, when I aim for an even texture and a well-blended piece. 3.
5. Place the image where you want it to be, in your collage. Try to place it exactly where you want it to be, or at least fairly close. If you lift, stretch, or drag a piece of magazine paper, it can stretch and look a little odd in your final work.
In this video i have tried to learn you , how to make paper collage in simple way and learn with fun.
Upload your own photos and experiment with various frames and grids to arrange them. Add more amazing elements. Enhance your collage by searching for more ingredients like stock images, illustrations, vectors and stickers. Then, crop, blur, add a filter, straighten and flip your photos using the photo effects feature. Save and share.
A collage of years of my work. The result was the work «Imaginær samtale med et speil». A work you can really get lost in. So many details and trinkets to see that you can never get enough. Two-colour screen print on 400 gram acid-free cotton paper in an edition of 35. Printed together with the print master Per Stene.
Follow along as Hallmark Lettering Artist Lynn Giunta shares her passion for tissue paper collage…and how to make a masterpiece of your own! Learn more and s...
In this video, I share an assortment of collage paper choices. What did I miss mentioning? And do you have a favorite?Newsletter Sign Up: https://pamhemmerli...