- PRO Courses Guides New Tech Help Pro Expert Videos About wikiHow Pro Upgrade Sign In
- EDIT Edit this Article
- EXPLORE Tech Help Pro About Us Random Article Quizzes Request a New Article Community Dashboard This Or That Game Popular Categories Arts and Entertainment Artwork Books Movies Computers and Electronics Computers Phone Skills Technology Hacks Health Men's Health Mental Health Women's Health Relationships Dating Love Relationship Issues Hobbies and Crafts Crafts Drawing Games Education & Communication Communication Skills Personal Development Studying Personal Care and Style Fashion Hair Care Personal Hygiene Youth Personal Care School Stuff Dating All Categories Arts and Entertainment Finance and Business Home and Garden Relationship Quizzes Cars & Other Vehicles Food and Entertaining Personal Care and Style Sports and Fitness Computers and Electronics Health Pets and Animals Travel Education & Communication Hobbies and Crafts Philosophy and Religion Work World Family Life Holidays and Traditions Relationships Youth
- Browse Articles
- Learn Something New
- Quizzes Hot
- This Or That Game New
- Train Your Brain
- Explore More
- Support wikiHow
- About wikiHow
- Log in / Sign up
- Hobbies and Crafts
- Paper Craft

How to Make a Paper Lantern
Last Updated: February 24, 2024 Fact Checked
wikiHow is a “wiki,” similar to Wikipedia, which means that many of our articles are co-written by multiple authors. To create this article, 43 people, some anonymous, worked to edit and improve it over time. This article has been fact-checked, ensuring the accuracy of any cited facts and confirming the authority of its sources. This article has been viewed 726,721 times. Learn more...
Paper lanterns are fun decorations that add a festive air to any occasion. With a few simple supplies, you can make your own paper lanterns to decorate with!
Making a "Snowflake" Lantern

- You can use any size circle. Just remember that the bigger the circle, the bigger the lantern. You can use a plate, the lid off a tub of ice cream, the bottom of a bucket, or any other round object.
- You can also use any kind of paper you want: regular white printer paper, colored cardstock, decorative patterned paper, etc.
- Continue this alternating pattern until you reach the bottom of the paper (the point of the triangle).

- Tie a string in the top (through the hole and the outer ring) and hang the lantern somewhere to enjoy it.
Making a Lantern with a Handle

- You can use a solid color piece of paper or a piece of decorative scrapbook paper to make the lantern more festive.
- You can also decide how large you want your strips to be. The number of strips will completely change the look of your lantern. An inch or so (2.5 cm) apart is fairly standard.
- You can also use a stapler to connect the two end pieces of the lantern.
- If you're hanging the lantern, however, you don't necessarily need a handle -- it can be hung through the base on ribbon or string.

- If your lantern is too straight-edged, bend it a bit. It will slowly give to the form you're putting it in. The heavier the paper, the more you'll need to force it into shape.

- Only use a candle inside if you are sitting the lantern on a flat surface, not if you are hanging it or using the handle.
Making a Tissue Paper Circle Lantern

- You can use all one color tissue paper, or choose to make your lantern multi-colored. Pick whatever color combination you desire, or whatever makes sense for how you intend to use the lantern.

- Don't make your circles too big or too small. If they are too big, the lantern won't be very billowy; and if your circles are too small, you'll be making much more work for yourself than necessary. Aim for something the size of a coffee can lid.
- Make sure that the bottom row of tissue paper circles hangs lower than than the paper globe lamp to give it that flowing, whimsical look.
Community Q&A
- Make them white with a couple of colors for meat lighting but if only do décor, add as many colors or designs as you want. Thanks Helpful 10 Not Helpful 0
- Don't put a candle or any other object that is flammable inside (unless in a glass) because it may cause a serious fire. Thanks Helpful 11 Not Helpful 2
- Use different colored cardstock or paper. Patterns will hide any asymmetrical lines. Thanks Helpful 9 Not Helpful 3
Tips from our Readers
- If you're making a paper lantern with children, get them to draw a picture on the paper before you cut it. This makes a unique and colorful lantern!
- Remember to use only a little bit of glue. Too much glue can cause the paper to crease.
- Draw your guiding lines in pencil so you can rub them out after cutting.
- Use plastic battery-powered tea lights so the lanterns don't catch fire.

- Never leave candles unattended! Thanks Helpful 11 Not Helpful 5
Things You'll Need
- Paper or cardstock
- Glue, tape, or stapler
- Tissue paper
- Paper globe
- String (optional)
You Might Also Like

- ↑ https://www.youtube.com/watch?v=u9CLt9VVUQY
- ↑ https://www.youtube.com/watch?v=jZzCWvJk-F4
- ↑ https://www.youtube.com/watch?v=f60sSWqug-Y
- ↑ https://www.youtube.com/watch?v=7RzRMxTrGd0
- ↑ https://www.youtube.com/watch?v=_vhryZk7NQo
- https://www.youtube.com/watch?v=CeZKYGmuZn0
About This Article
To make a paper lantern, you’ll need a rectangle-shaped piece of paper, scissors, and tape. First, cut a 1-inch (2.5-cm) wide strip off of one of the short ends of the paper for the handle and set it aside. Then, fold the paper in half lengthwise. Make evenly spaced cuts into the folded side of the paper that go almost all the way to the open side. Now, unfold the paper and bring the short ends together so they’re overlapping. Tape the short ends together. Finally, stand the paper lantern up and tape the ends of the handle to opposite sides on the top. Did this summary help you? Yes No
- Send fan mail to authors
Reader Success Stories
Linda Evans
Jan 3, 2017
Did this article help you?
Sep 22, 2017
Mary Jordan
May 30, 2017
Shanjai Rasappa
Nov 27, 2016
Jan 31, 2022

Featured Articles

Trending Articles

Watch Articles

- Terms of Use
- Privacy Policy
- Do Not Sell or Share My Info
- Not Selling Info
Get all the best how-tos!
Sign up for wikiHow's weekly email newsletter
How to Make Paper Lanterns (Step-by-Step)
Home » DIY » How to Make Paper Lanterns (Step-by-Step)

These Chinese paper lanterns are such a fun paper craft for anyone to make. They do for beautiful cozy decorations at home.

Did you know that paper lanterns have different meanings and symbolism in different countries? And, depending on where they’re from, they can be made using paper, silk, with bamboo or wood, with real candles or just a pseudo-source of light?

There are also dozens of different festivals across the globe that are celebrated with lanterns at the heart of the celebration and festivities. Lanterns are just that amazing.
So, in the spirit of all that festivity and celebration of light and traditions, let’s take a look at how to make a paper lantern of our own right at home!
Also, give these paper crafts for adults a chance in case you love a good paper DIY project .

Supplies and Tools You’ll Need
Here’s a list of everything you’ll need for this project:
- 1x sheet of white paper (10″x 12″)
- 1x craft paper (12″x 12″)
- Decorative tape
- Double-sided tape
- Retractable blade knife
- 3x paper strips (12″x 1″)

Watch: DIY Paper Lanterns
Not much of a reader? Check out a full tutorial on how to make these on video!
How to Make Paper Lanterns
So, if you’ve gathered all the different materials you’ll need, read ahead to find out how you can make your own paper lanterns.
The first step is to pick out craft paper that you really like. You can use textured, colored, and printed paper, as long as it’s colorful and pretty and not too opaque that the light can’t filter out.
So, once you’ve picked out the paper, turn it over on your work surface. Using a ruler and a pencil, draw two lines: one each about half an inch or 1 cm away from the bottom and top of the paper.

Don’t put away your ruler and pencil just yet. Place the ruler over the line you just drew and draw markers along that line at every centimeter gap.
Repeat this for the second line at the bottom of the sheet, too.

Next, turn your ruler around and line it up so that the top edge and bottom edge of the ruler are both on the first markers of both lines. Draw a line connecting the two.
Proceed to draw vertical lines connecting each of the markers across the top line with their subordinating ones.

Grab a craft cutter and use your ruler to cut down the lines, as seen below. Just a word of caution: don’t cut beyond the two lines at the top and bottom of the page, or your lantern will just fall apart.

After you finish cutting the paper into strips, your craft paper should look like this.

Next, use your cutter to remove just one strip right at the end of the sheet so you can make a gap, as seen below.

Next, grab a roll of double-sided tape and a plain white sheet of paper. Tape two long strips of the double-sided tape at the top and bottom of the sheet.

Stick both the top and bottom of the craft paper to the top and bottom of the white sheet.

The white sheet is smaller than the craft paper, so when you tape them, you’ll find that the latter will create a tunnel or mound-like bubble down the middle.

Turn the paper around and tape another strip of double-sided tape, this time on the side of the paper, as seen here. Don’t worry; just trust the process, and you’ll see why we’re all out of proportion at the moment.

Next, grab the side you just taped and carefully fold it over to the opposite end.

Remember when you cut out one strip to leave a gap on that end? Well, you’re going to stick the taped side to that end of the paper. Don’t you just love how the craft paper strips are billowing out?

Your lantern should look something like this once you’ve taped the ends together.

But we’re not quite done just yet. If you want a little extra jazz and a better finish for your lantern, then start by cutting two strips—three strips if you want a handle—of white paper.

Tape a bit of double-sided tape along two of the strips and stick them around the top and bottom of the lantern.

With the last strip, simply tape either end of the paper and fold it into a curved handle as you stick it in place at the top.

Feel free to decorate your paper lantern with washi tape, glitter, and any other embellishments you can think of.

You can also place an electric tea light candle inside to light it up.

What Kind of Paper Do You Use to Make Lanterns?
You can use different types of paper to make your paper lantern. Just take a look at your options:
- Construction paper is perhaps the most popular choice as it’s easy-to-find, cost-effective, and comes in pretty colors and prints.
- Card stock, too, is pretty popular. But, it can be a little too opaque, especially if you pick up heavy card stock.
- You can also use tissue paper or copy paper, but they’re not going to be as durable or easy-to-handle as the other two.

How to Use these Chinese Paper Lanterns?
Paper lanterns would look gorgeous just about anywhere, don’t you think? Here a list of where you can use the and how you can use them:
- At parties and gatherings as decorative pieces.
- During festivals and rituals. You can hang them up from the porch, the deck, or even from an awning or rooftop.
- You can set them on the mantel, on a low side table, or on your craft desk.
- String them up with some twine and hang them across the backyard or over doorways.

Other Crafts You Might Want to Make
- DIY paper squishies
- How to Make Scented Candles
- DIY paper flowers
- How to Make Paper Rings
- DIY Hair Bows
- DIY Phone Holders
- 47 DIY Projects That Are Fun to Make
- 41 Rock Painting Ideas
- 36 Construction Paper Crafts

These DIY paper lanterns are a perfect paper project that will help you to decorate your home on a budget. An easy, fun craft for adults and teens.
- 1x sheet of white paper (10"x 12")
- 1x craft paper (12"x 12")
- 3x paper strips (12"x 1")
Instructions
- Gather all your supplies to get started on this project.
- Turn your craft paper over with the right side facing down.
- Using a pencil and a ruler, draw two lines—one each at the top and bottom of the paper about a centimeter away from the edge.
- Next, make markers at every centimeter gap along both lines.
- Using the ruler and pencil, connect the markers on either end by drawing a line from top to bottom. Repeat this across the paper with all the markers.
- Grab a craft cutter and make incisions down each individual line you just drew. You paper will now be divided into strips joined by the strip
- Cut out the very last strip to create a gap.
- Next, grab your white paper and line both the top and bottom with a length of double-sided tape. Carefully stick the top and bottom of the craft paper(with the printed side facing up) to the top and bottom of the white paper.
- The white paper is smaller in size, so the craft paper will billow out.
- Next, line the sides of the white paper with double sided paper and roll it inward to stick the ends together. If you remember, you cut out one strip right at the end to create a gap. So, stick the side of the paper you just rolled onto that gap.
- To get a better finish on your lanter, cut out three more strips of white paper. You can line two of those strips with double-sided tape and stick around the top and bottom of the lantern.
- The third strip can be folded into a handle and then stuck onto the top.
- Feel free to decorate your lantern with washi tape, stickers, glitter, and other embellishments. You can also place an electric tea light candle inside to light it up.
How to Make Paper Lanterns
Nora Nalle is a kids' crafts expert, writer, and teacher with almost a decade of experience creating crafts and STEM craft tutorials for children. She was also a craft stylist for for the "All You Frightfully Fun Halloween Handbook," which focuses on kids' Halloween projects.
:max_bytes(150000):strip_icc():format(webp)/NoraHeadShot-5bbf760146e0fb0058dbf587.jpg "i want to make a paper lantern")
@nadydelarosaphotography / Instagram
- Total Time: 30 mins
- Yield: 2 lanterns
- Skill Level: Beginner
- Estimated Cost: $5
Paper lanterns are incredibly quick and easy to make, and they're extremely versatile to use as decorations. You can make them with craft paper in the colors and patterns of your choosing to fit any design preference or theme. They look great sitting on tables as centerpieces, strung up as hanging decor, and more. You can even hang them on string lights for a whimsical look. This tutorial explains how to make a basic paper lantern. If you want to jazz it up, you can trim the lantern with ribbon, add glitter, draw on the paper, or otherwise get creative.
@nadydelarosaphotography / Instagram
What You'll Need
Equipment / tools.
- 2 toilet paper rolls
- 2 sheets 12 inch-by-12 inch craft paper in contrasting colors
Instructions
Cut 1 sheet of paper in half.
First, select which color or pattern of your craft paper you want to be on the inside of the lanterns and which you want to be on the outside. Cut both sheets of paper to 12 inches by 12 inches if they aren't that size already.
Next, fold your sheet of paper for the inside of the lanterns in half, unfold it, and cut it along the crease you made. Each toilet paper roll will only require one of these halves you just cut.
Size the Paper to Fit the Rolls
Wrap each craft paper rectangle you just cut around a toilet paper roll. Cut off any excess, so the paper just covers the roll.
Glue the Paper to the Rolls
Use glue dots to secure the sized craft paper to each toilet paper roll . You should need about six glue dots per roll.
Measure and Cut the Outer Paper
Now, lay one of the toilet paper rolls on top of the craft paper you're using for the outside of the lanterns. Wrap the paper around the roll, and cut just enough to fit around the roll once. Then, cut another piece of paper in that same size for the second roll.
Make Slits in the Outer Paper
Fold one outer paper piece in half lengthwise. Then, cut slits into the folded side, stopping about an inch from the other edge. The more slits you make, the more of the inner paper you will see on the lantern. Unfold the paper. Repeat this process for the other outer paper piece.
Attach the Outer Paper to the Rolls
Wrap each outer paper piece around each toilet paper roll, and staple the paper to the rolls around the top and bottom. Pinch the slits in their centers, so they pop out.
Attach the Ribbon Handle
To make a handle for your paper lantern, cut a piece of ribbon in any length you wish. Use glue dots to attach the ribbon to each side at one end of the lantern. Repeat for the other lantern.
More from The Spruce Crafts
- How to Make Fabric Star Quilted Christmas Ornaments
- 22 Crafts for Elementary School Kids
- Different Types of Craft Paper and Their Uses
- How to Make Toilet Paper Roll Binoculars
- Ways to Make Your Own Pinata
- How to Make a Folded Paper Gift Box
- How to Make DIY Gift Bags
- How to Sew a Paintbrush Roll-Up Organizer
- Easy Origami Envelope Instructions
- How to Make Paper Flowers
- 25 Creative Ways to Craft With Newspaper
- DIY Ribbon Wreath
- How to Make a No-Sew Tree Skirt
- How to Make a Cute Origami Sail Boat!
- Easy Origami Bow Tie Tutorial
- How to Make an Origami Birthday Card
- Decorations
- Women’s Day
- Mother’s Day
- Father’s Day
- 4th of July Crafts
- Painting & Drawing
- Cardboard Crafts
- Video Tutorials
- Step by Step
15 Stunning DIY Paper Lanterns and Lamps – Step by step

Related articles

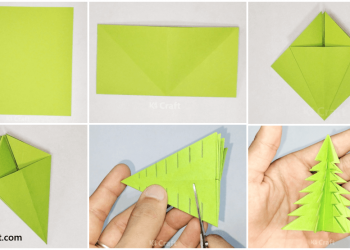
How To Make Kirigami Christmas Tree – Step by Step Tutorial
How To Make A Origami Hat – Step by Step Tutorial
Make your space shine with these bright paper lanterns and lamps! These fun ideas are perfect for parties or for adding some sparkle to everyday living. Paper lanterns add a festive air to almost any occasion. Here are some lovely DIY ideas for paper craft.
Paper lanterns add a spark to your room and that too at a very low cost. They can add an X-factor to your house which is missing somewhere. Even the hefty and expensive lights does not do the work that these paper lanterns do. But since they are in itself very plane and you want to beautify them more, then you can have a look below. I have narrowed down some of the best DIY paper lanterns here in this article for this purpose.
DIY Paper Lanterns and Lamps
Diy super fun bunting wrapped lantern – step by step.
This DIY bunting wrapped lantern is super fun to make. This beautiful bunting wrapped lantern can enlighten your home and can give it a scintillating effect. It can also be used as a decorative item on festivals like Diwali.

Image source: project nursery
- Difficulty Level: Easy
- Material Required: White Plain Lantern, Blue Lace, Buntings, Glue Gun
- Description: This white lantern wrapped around with pastel blue color lace and multi -colored buntings can give a scintillating effect to your home. The material required is easily available in our homes. You just need few minutes to make this bunting wrapped lantern and you are ready to rock. The colors used in making this lantern can sooth the eyes of the viewer.
DIY Wax Paper Capiz Shell Chandelier – Step by step
Hearing of wax paper, what is that first thing that comes to your mind? Cooking, right? Can you ever imagine making a DIY wax paper capiz shell chandelier out of wax paper. Yes, that’s right and that too not an ordinary one but a conspicuous one.

Image source: design sponge
- Difficulty Level: Difficult
- Material Required: Hanging planter basket, white spray paint, ribbon, scissors, 1-2 rolls wax paper, 2 big pieces of parchment paper, iron, hot glue gun & glue sticks, circle cutter (i didn’t have any luck with a “punch”), cutting mat.
- Description: This wax paper chandelier can be hung above the dining table ceiling . Also, it can be used to fill an empty ceiling and its not even expensive like other chandeliers :p. The wax paper is easily available in the market. Go, and start making this fun and attractive wax paper capiz chandelier. If you are a kid then I would suggest you to make it under the guidance of an adult.
DIY Recycled Newspaper Tube Lamp – Step by step
We all find reading newspapers a tedious and monotonous task. What if I tell you we can create something fascinating out of them. Don’t believe me ? Below is the image of a lamp which is made out of newspaper tubes.

Image source: marrietta
- Material Required: Newspapers, lamp stand (having installed the bulb and the wire) & Glue
- Description: This pentagon shaped recycled newspaper tube lamp may require two people in the making. This lamp might be looking complex because of its structure, but once the base pentagon is ready the lamp can be a cake walk. Remember to put each pentagon in an asymmetrical manner. This lamp can be placed in a room and can be used as a night lamp.
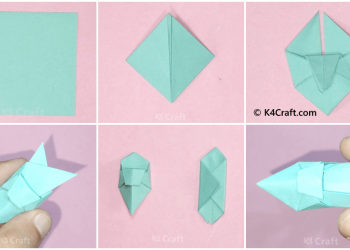
DIY Chinese New Year Paper Lanterns – Step by step
On the occasion of new year we like to decorate our homes with different things. But many a times we either fall short of ideas or of time. These Chinese New Year paper lanterns solve both the purposes.

Image source: craft craft
- Material Required: A plastic tube , sheets (pink, green, purple and red), string to hang
- Description: These DIY Chinese paper lanterns are super fun to make. They can be a perfect craft to showcase your artistic talent this new years . Not even they solve the new year decoration purpose but also can be used to embellish your surroundings in general.
DIY Paper Cup & LED String Lamp – Step by step
If one of the corners of your room is empty and you are not able to get on what to put there. Also, you don’t want to spend enough money on it then this is the right place for you. Below, you can see the image and description of an eccentric LED lamp.

Image source: aditi odyssey
- Difficulty Level: Moderate
- Material Required: Paper cups, glue, LED lights, stapler,
- Description: Are you a tea person or a coffee person? Hahha. Does not matter, you just need the paper cups to make this quirky paper cup & LED string lamp. While stapling up the cups into a bunch be careful that you do not get hurt. Make sure to use the LED lights of good quality otherwise your hard work can go in vain.
DIY Cute Cupcake Liner Lantern – Step by step
Cupcakes are flavoursome, don’t you agree? A juicy, tender and chocolaty cup cake is equivalent to being in heaven. The cupcake liners in which the cupcakes are made can be used to make a cute looking lantern.

Image source: hgtv
- Material Required: A big sized paper lantern, cupcake liners (any color you like, here I am using green, pink and yellow ones), hot gun glue and glue sticks
- Description: You just need 3 types of material for such lantern. These cupcake liners can be pasted in any pattern as you wish to. But here I am giving the description of the flower pattern. You can innovate with the designing. You can use this immense and attractive looking cupcake liner lantern to fill out a huge empty space of your room.
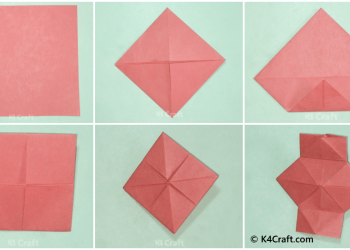
DIY Paper Doily Lantern – Step by step
Paper doilies are ornamental mat used as a table top etc. But there is another and innovative use of paper doilies as well. These paper doilies can be pasted on a paper lantern and can be used to make them look much more attractive.

Image source: ruffled blog
- Material Required: Paper lantern, paper doilies, scissors, double-sided tape, string to hang
- Description: This paper doily is a pleasure to make. This can be used to hang in the rooms and even in the outer areas of your home sweet home. If you want to throw a party having a white theme and want to have a white decoration , this can be a perfect choice.
DIY Creative Jellyfish Lamp – Step by step
Love the sea-life? Want to imagine yourself having scuba dived into the sea? This creative jelly fish lamp can fulfill your wish. Jelly fishes are pretty looking and fascinating sea creatures . Imagine them being hanged on one of your ceilings. Even the thought of it is just ecstatic.

Image source: i need a craft room
- Material Required: Paper lantern, sequin laces, ribbons, LED bulb
- Description: This creative jellyfish lamp can be hung anywhere in the room. If the walls of your room are of sea green or blue color, then it would be an icing on the cake. Those colors can give you a full feel of the marine life when you will switch on the jelly fish lamp in the night. These lamps can also be used in the marine life themed parties. You can use a torn lamp as well as you will only require the half part of it.
Amazing DIY Jazzy Rainbow Lamp – Step by step
A Rainbow gives you joy and happiness. It adds colors to your life. Similarly, this DIY Jazzy rainbow lamp can add colors to your room and life.

Image source: metunda universe
- Material Required: Paper lantern, tissue paper (all the 7 colors of a rainbow), glue
- Description: If you love the monsoon season then this rainbow DIY paper lantern is the perfect choice . Your fondness of monsoon will be an impetus to make this DIY paper lantern. Now, you can have the feel of the monsoon throughout the year. No need of waiting. This rainbow lantern can be hung anywhere in the room. Remember to start pasting the tissue paper from the bottom to the top.
A Stunning Embellished Paper Lantern – Step by step
Are you a nature lover? What if I say you can bring nature to your room. All the flowers, butterflies and pearls of the sea that calms you down can be right in front of your eyes. Yes, below is the picture of the paper lantern embellished with all the pretty things of the nature.

Image source: glu e arts
- Material Required: Paper lantern, magazine cut outs, pearls, tissue paper, blue crepe paper, scissors, glue, light cord set for hanging,
- Description: This white DIY paper lantern can give you all the happiness of the world when it lights up. The combination of blue crepe paper and magazine cut outs make it really noticeable. You can also use a different kind of combination of the paper cutting being used as per your color choices.
DIY Enchanted Coffee Filter Snowball Light – Step by step
Winters is the favorite season of mine. Especially the places where there is a lot of snow. You can always play withe snow and make a snow man and have fun with all the snow ball fights. wish that winters season should be there for all the 12 months? This DIY enchanted coffee filter snowball can fulfill this one wish of yours.

Image source: crafty nest
- Material Required: Round shaped net sheet, coffee filters, scissors, glue , LED lights
- Description: Take a round shaped net and tie the LED lights as shown in the picture above . If you are a kid then definitely do this under the supervision of an adult. After this start putting the coffee filters of white color. Hang this DIY coffee filter snowball on any of the walls behind the bed and bring the winter season back to your life.
DIY Easy Glitter Disco Ball Lantern – Step by step
Want to add a little glamour to your party and shine bright? What it takes is making a simple glitter disco ball lantern. These balls gives an oomph factor to your party.

Image source: oh happy d
- Difficulty Level: Very easy
- Material Required: Paper Lantern, spray glue, glitter (any color)
- Description: This glittered disco ball lantern can be used on any kind of occasion, be it a birthday party or a disc party at your home. These balls can give the feel of a discotheque and is quick and simple to make. You can always experiment withe colors of the glitters.
DIY Flower and Pom Pom Lanterns – Step by step
White is the sign of peace. White is the sign of serenity. It does not have any brightness in it still the irony is it looks so elegant. If any room in your house is having a white theme then this DIY paper lantern is an ideal one.

- Material Required: Paper lanterns, white beads lace, white artificial flowers, glue gun and glue sticks, scissors
- Description: This DIY paper lantern is a pleasure to make, looks stylish and top of all involves a very low cost. Both the flower lantern & the pom pom lantern just looks as if they have been purchased from a showroom. When you light them , they cheer the room up.
DIY Scrap Paper Lamp – Step by step
As it is said pink color belongs to the girls and they own it. So, to all the girls out there here is the description of a classy looking pink shade DIY paper lantern. This catchy lantern can light up your room like the other sophisticated lamps available in the market.

Image source: painted by prestige
- Material Required: A paper lantern, scrap paper, scissors, glue gun and glue sticks
- Description: Make your paper lantern look more interesting and eye- catching with this DIY scrap paper lamp. This beautiful looking DIY paper lantern can give your room a serene environment. As you can see the picture itself it is giving the vibe of a crystal lamp. This lamp looks really elegant after its completion and involves a minute cost.
DIY Thumb Tack Pattern Paper Lamps – Step by step
Below is the description of the blazing DIY paper lanterns. You can experiment with any kind of colors. Here, I have used yellow, green, blue and pink as they goes with my room’s wall colors.

Image source: lines across
- Material Required: Card stock sheets, thumb tack, pencil, eraser, scissors, double sided tape
- Description: These thumb tack pattern lamps might consume a lot of your time but after their completion you will have a feeling they were worth the time invested into them. If kids are making this lantern I would suggest that you do it under the guidance of an adult. When these lanterns are lit up their aura can give you strength and hope.
DIY Pearls Decorated Craft Projects – Step by step
Diy heart shaped resin pendant tutorial, related posts.
100+ Unique Diwali Ideas – Cards, Crafts, DIY, Décor and Food
How to Make A Kirigami Sandal (Cinderella Version) – Step by Step Tutorial
How To Make An Origami Lantern – Step by Step Tutorial

How to Draw a Gorilla for Kids – Easy Step by Step Tutorial
Leave a Reply Cancel reply
Your email address will not be published. Required fields are marked *
Save my name, email, and website in this browser for the next time I comment.
What is new?

100+ Rangoli Designs for Diwali (Deepavali) 2024
50+ beautiful peacock rangoli designs 2024, 100+ diy craft ideas for india independence day & republic day, 70+ green colour day craft ideas for kids, 40+ best ganesh chaturthi decoration ideas at home 2024, 10+ lord ganesha rangoli designs 2024, 20 beautiful and easy mehndi designs, gandhi jayanti craft ideas & activities for kids (2 october), blue day craft ideas & activities for preschool kids, school decoration ideas for spring season.
- Art & Craft
- Best Out Of Waste
- Celebrations
- Education with Crafts
- Eid al-Fitr
- Food Decoration
- Friendship Day
- Ganesh Chaturthi
- Hair Styling
- Happy Holidays
- Human Rights Day
- Independence Day
- Janmashtami
- Karwa Chauth
- Kids Corner
- Lifehacks & Clever Ideas
- Lohri and Sankranti
- Mother's Day
- Paper Crafts
- Rangoli Designs
- Republic Day
- Sanktanti / Pongal
- School Decoration
- Science Projects
- Sewing & Embroidery
- Teacher's Day
- Thanksgiving
- Valentine's Day
- Women's Day
K4 Craft follows a holistic approach to nurture talent and teach everything related to crafts including simple decorations, jewellery, knitting, embroidery, paper crafts, quelling, ceramics in addition to fundamental tutorials for beginners.
- Advertise With Us
- Privacy Policy
- Terms of Use
Explore Popular Categories
DIY Paper Lanterns Decor
Share the fun!
Make beautiful DIY paper lanterns for easy, budget friendly home decor.
This week we are putting the finishing touches on our winter mantel ! I was starting to get a little bit worried that spring was coming. We had a couple rain storms that melted all our snow.
But then the big daddy snow storm came and dumped about 8 inches on us and I realized I still had time to get my winter mantel all ready to share with you. So today I am sharing how I made these DIY paper lanterns.
Yep, you read that right, these are made out of paper.
This post may contain affiliate links. As an Amazon Associate I earn from qualifying purchases. Click here to read my full disclosure policy.

I am kinda obsessed with all the things that you can make and transform with paper. My mantel is a shining example of all the things that you can make with it, without it looking cheap.
I love seeing people’s face when they come over and comment on how much they like an item then I tell them it is made out of paper. These lanterns are no different.
While figuring out how to make these DIY paper lanterns, I learned a few tricks to make them extra sturdy. Using these 3 extra tips you will be able to make any paper lantern look like a high-end metal lantern from your favorite home decor store.
Tips to Make Sturdy Paper Lanterns
- Use coverstock (which is 110lb+ cardstock) to cut out your paper lanterns.
- Use hot glue for fast, but permanent and strong joints.
- Spray paint the paper lanterns to give the paper extra weight and texture.
- Glue something clear or frosted on the inside of your lantern window to make it more durable. I like to use thin plexiglass sheets (Amazon link) or these clear plastic craft sheets (Amazon link) .

I actually made 3 of these lanterns for Christmas. You may have noticed them in our Christmas home tour . I put the red one away, but the silver and white one were perfect for winter (and really anytime).
You better believe I will be using these lanterns lots more this year. They are perfect for the rustic farmhouse style that I love.

To make cutting out these DIY paper lanterns much easier, I used my Silhouette Cameo cutting machine. You may notice I am slightly obsessed with this little craft machine.
However, you can make these lanterns without it. A good pair of scissors and an x-acto knife can do the same thing if you have a little bit of patience.
How to Make DIY Paper Lanterns
- The cut files for the 3 lantern designs were free to my subscribers until 9/1/2018. Now they are available to purchase in the shop. Make sure to subscribe so you will be notified of new freebies!
- Cover stock (100 lb cardstock paper)
- Hot glue gun and glue sticks
- I have found the hammered metal spray paints give a nice texture to the lanterns. Or for a more plastic look to the lantern, a high gloss colored spray paint looks really nice.
- Plexiglass sheets
- X-acto knife or utility knife
- Battery powered candles
- Silhouette Cameo or Cricut electronic cutting machine (optional)
Cut out the template
I love using coverstock for extra sturdiness. Regular cardstock is 60-65 lb and cover stock is 100-110 lb. It is almost twice as thick and makes things really sturdy.
I have not had any luck being able to print on the coverstock though. It is just too thick to run through my printer. If you are using the printable PDF instead of a Silhouette cutting machine, you might have to print a template onto a piece of regular cardstock, cut it out, then trace it onto the cover stock.
If you don’t have coverstock, don’t worry. Regular cardstock will work too.
Start by cutting out the pieces you will need for your lantern. You will need 2 of the side pieces and one of the two pieces needed for the top.

Assemble the lanterns
Fold the side pieces so they form a box. Glue the two pieces together at the tabs. I love hot glue for all my paper crafts. It will dry fast and hold tight on the porous paper.

Fold the top of the side pieces so they form a pyramid on the top. Glue the tabs to secure.

Now it’s time to make the top. Start by folding the square base and glueing it together at the tab.

Quickly place a bead of glue on the bottom of the top box and secure it to the top of the pyramid. If you notice any of the glue dried before you were able to secure it, add some more glue on the inside of the box.
The excess glue will be hidden and the top will be secure.

Now shape the very top piece. There are a couple different shapes but they are easy to fold and secure with glue at the tab. Again working quickly, add a bead of glue around the top of the top box and secure the top piece.

Now that they are all assembled, the next tip comes into play. Did you know you can spray paint paper? It adds a nice coating to it to really make it look like metal or plastic!
Paint the decorative lanterns
I love all the metal finishes they have now, but by far my favorite is the hammered metal finishes. They add a lot of depth and texture to the lanterns.

One thing to note with the hammered metal, it will leave spots with less coverage. This can be really nice if you want to have a secondary color peeking through.
But if you want an oil-rubbed bronze lantern and you have white cover stock, you will need a lot of paint to cover the white, or you can use a black first coat followed up with a hammered bronze paint.
So take your lantern outside and have some fun. Try a few different layers, or colors. This one was painted red first, with Rustoleum Weathered Steel hammered metal on top.

Add to the lanterns
And finally, use plexiglass or clear plastic craft sheets on the inside of these DIY paper lanterns for a slightly opaque window. It also adds some nice weight to the paper lanterns so they will not move.

Measure your lantern for the correct size, you want the plexiglass to completely cover the window on the side, with enough room to glue it to the lanterns. The clear plastic sheets are easily cut with a ruler and an x-acto knife.
The plexiglass is also quite easy, just follow the steps below.
How to Cut Plexiglass
- Place a ruler on the plexiglass where you need to cut it. I love these thick quilter’s rulers for all my craft cutting.
- Run an x-acto or utility knife down the edge of the ruler score the glass about 10 times (no need to be too specific, just make sure you have a good solid score line).
- Place the plexiglass on the edge of a hard surface (like your table or counter top) with the score line just over the edge and facing up. Press down on the plexiglass and it will snap!

Using the hot glue, secure the plexiglass or clear plastic to the inside of the lantern on all four sides. Now you are all done. Time to use your new DIY paper lanterns as the perfect decor.

Please note that these lanterns are not for use with a real candle! They are made our of paper. But there are some absolutely beautiful wax, battery-powered candles that work wonderfully in them.
Or put a small string of Christmas lights inside them for a fairy-light type of glow. The plexiglass is a bit opaque and would look beautiful with either (or neither) form of light.

If you love these paper lanterns, you are going to love these other paper decor items that no one will know are made out of paper!

Easy DIY Decorative Paper Lanterns
Make these DIY paper lanterns to add a handmade touch to your home decor. They are beautiful and budget-friendly too!
- Paper lantern cut files
- Cover stock
- Spray paint
- X-acto knife
- Electronic cutting machine (Silhouette Cameo or Cricut)
Instructions
- Cut out the pieces you need for your lantern.
- Fold the side pieces so they form a box.
- Glue the two pieces together at the tabs. Fold the top of the side pieces so they form a pyramid on the top.
- Glue the tabs to secure.
- Fold the square base and glue it together at the tab.
- Place a bead of glue on the bottom of the top box and secure it to the top of the pyramid.
- Shape the very top piece.
- Spray paint the lantern with the color of your choice.
- Use plexiglass or clear plastic craft sheets on the inside of the DIY paper lanterns and attach with hot glue.
Recommended Products
As an Amazon Associate and member of other affiliate programs, I earn from qualifying purchases.

The Best Home Decorations made from Paper
- How to Make a Decorative Windmill
- Faux Metal Farmhouse Sign
- Easy $10 Anthropologie Mirror Knock Off Tutorial
- Faux Wooden Snowflake Decor

This site uses Akismet to reduce spam. Learn how your comment data is processed .
Victoria Jacobs
Tuesday 8th of October 2019
I really love what you have created.
Thursday 10th of October 2019
Thanks Victoria!
Friday 18th of January 2019
Any other way to pay to get the downloads as i am not using paypal?
Saturday 19th of January 2019
If you click on the option to use PayPal, at the bottom there is a bottom to pay with a Credit or Debit without an account. Let me know if you have any other questions!
Saturday 1st of December 2018
Hola quisiera saber donde consigo los moldes gracias
Monday 3rd of December 2018
The lantern templates are available to purchase in the shop here: Paper Lantern Cut Files.
Jeannie Phillips
Sunday 11th of November 2018
Nevermind. The file is to a compound path, the objects are merely grouped together. Duh - see what happens when you assume? Great file. Thanks.
Thursday 15th of November 2018
So glad you figured it out! Enjoy them :)
This is a new one for me, the file will not allow me to release the compound path in Silhouette Studio. It is a shame that I cannot use the file for personal use as I intended. I want to remove the score lines so that I can score by hand AND I want to remove the diamond shapes and substitute in stars. Any thoughts?

making things by hand

How To Make Beautiful Paper Lanterns
I love making these origami paper lanterns for celebrations and holidays. I show you how to make these lanterns out of watercolor paper in the video below. Follow along step-by-step — they are actually quite easy to make!
A friend gave me one of these lanterns years ago and I was immediately charmed by its simplicity and beauty. And I do love me some paper crafts! I used to do a lot of hand bookbinding, so anything that calls for busting out my bone folder gets a heart from me.
These make a beautiful addition to any gathering or party, and they make a lovely simple gift.

Paper Lantern Supplies
- Watercolor paper , 90 lb, hot or cold pressed
- Watercolor paints and brushes
- Mineral Oil
- Bone folder (not essential but very helpful)
- Xacto knife or mat knife and straightedge
Paper Lantern How-To Video
I’ve put together a video for this post to show you how to make the lanterns. It’s just easier with paper folding and origami than trying to draw or explain all the folds. One thing to note, be careful what surface you use to fold the lanterns on since some of the oil will come off on your hands and on to the surface.
Abstract Watercolor Painting Video
And… since I’m not much of a painter, I asked my mother-in-law Jean Lurssen if she would do a video about how to do abstract watercolor paintings. Jean has been teaching online watercolor classes for years and has quite a following.
Jean and my daughter Eliza teamed up to make a video teaching you how to easily paint these kinds of watercolors. They like to paint together and Neenie, as we call her, has been showing Eliza these kinds of techniques for years. It’s very sweet — those two have a lovely banter, and they make it so easy to copy and learn their techniques!
I hope you enjoy your paper lanterns! If you are using real candles, be very careful not to leave them unattended since the lanterns are made of paper. If you have children or just want to be 100% safe, you can use the battery-operated tea lights, like the ones in the photo here.

Please pin this post if you like it, and please join my email list! Try my other holiday DIYs like this Dried Orange Garland and these easy Ginger Molasses Cookies.
I’ve been following Jean’s incredible art and learned so, so much. Thank you very much for your emails as I’m thrilled with the projects you’ve shown us. Especially the origami candleholders which I am making for the holidays. They are stunning! I look forward to your emails and I’m so happy you; your mother-in-law and daughter shared such wonderful talents with us.
Thank you so much Janice! Jean is a gifted painter and teacher — I was thrilled to have her help out with this project.
Thank you so much for the beautiful candleholder instructions! Looking forward to your next project!
Thanks Joy! Working on some projects that I’m hoping to get done soon, but our college boy comes home tomorrow after six months (gasp!) away, so I’m going to spend as much time with him as he’ll let me for the next week :).
September 27, 2022 at 10am I am so happy to have found your site. It brings me joy and creative energy.
Thank you for being you,
Leave a Reply Cancel reply
Your email address will not be published. Required fields are marked *
This site uses Akismet to reduce spam. Learn how your comment data is processed .

DIY Paper Lanterns with Beautiful 3D Flowers Design
- Updated on February 28, 2021
- In Arts and Crafts DIY Home Decor
- 31.4K shares
DIY paper lanterns are some of my favorite things! They are simple to make, and can add ambiance to any space instantly.
You can download the free DIY paper lantern templates at the end!
( Update: After I published this tutorial, many people have told me that they used these DIY paper lanterns for their weddings ! It is so rewarding to hear that! )
These 3-dimensional flower DIY paper lanterns with lights are made with very simple materials:
old drinking glasses or vases, paper, and LED lights or candles! ( Some of the helpful resources are affiliate links. Full disclosure here . )
*Some resources in article are affiliate links. Full disclosure here .
You may also love these new improved DIY paper lanterns: this new set of paper lanterns are made with plastic bottles and LED string lights!
Materials and tools for the DIY paper lanterns:
- glass vase or drinking glass with straight sides, such as cylinders or cubes. You can find them even at the Dollar Store!
- paper : I used this great quality index card stock .
- I used a Silhouette Portrait – LOVE that little machine! – but it’s easy enough to cut with an X-acto knife
- double sided tape
- to light up our paper lantern, I recommend LED candles or micro LED Warm White String Lights which are very bright, and are safer than real candles!
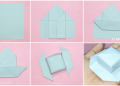
Step 1: Print and cut paper lanterns designs
Print the template on paper, I used sturdy 110lb index card stock such as these .
Cut out the leaves and stems, and cut along the lines of the petals, be careful not to cut too much and cut them off.
Next, measure the size of your glass and cut the excess paper away.
Step 2: Attach paper lanterns to glass vase
Now the fun part! Gently fold those petals up so the blossoms become three dimensional!
Use double sided tape to tape the paper onto the outside of the glasses. You will have a beautiful paper lantern!
Now we can patiently waiting for sunset to light up the candles and appreciate the beauty and magic of these DIY paper lanterns!
Although it is nice to have a bright candle flickering inside the paper lantern, I highly recommend using LED candles or these LED Warm White String Lights which are very bright, and are safer than real candles!
Download the free paper lantern templates here
Love paper and art? You need no art experience to make this watercolor in 10 minutes , but you do need a toothbrush, wha?!?
Another set of paper lanterns are here! With colored glow!
Happy crafting!
You may also love:

25 Inspiring Vegetable Garden Design Ideas

Easy DIY Solar Fountain in 1 Hour {with Pond Water Plants}

20 Best Vegetables for Container Gardening
136 comments.
Hi Ananda! I used these paper lanterns to decorate tables at the rehearsal dinner for my son’s wedding. They were beautiful!! Everyone were amazed that these were paper & since I had to ship decor out of state, I used plastic water bottles with river pebbles in the bottom. I’d love to share those pictures if I could figure out how, here. Thanks for sharing this beautiful art work!!!
hi Kim! congratulations!! and thank you for sharing your beautiful experience! we are looking at ways for readers to post pictures hopefully soon! 🙂
Hi, I am trying to get the paper lantern template I subscribed but no email has been sent to download the template . Please help .
Hi Donna! please check promotions folder in gmail! 🙂
Why can I not download the houses? I subscribed to the letter. There is no link to be able to print or download these
hi! link to ALL free downloads is in our weekly newsletter & welcome email! please check promotions folder! 🙂
Hi Ananda! These lanterns are gorgeous!! Have you done these paper lanterns using colored paper? If so, how does it turn out? My wedding colors are sapphire blue and copper/rose gold. Love the lanterns but would like to incorporate my colors. Any suggestions? Thank you!
hi Leah! congrats!! 🙂 i think colored paper would be lovely! regular thickness paper is probably better than thick card stock. definitely test one first! 🙂
Those look amazing. But I could not download it. I have tried all ways you said, do you think you could send it to my email, please? I am looking forward to seeing it. Thanks
I just signed up for a subscription, and the downloads link in my confirmation email took me to a page with all of the projects with the “download” listed beneath each one. When I click on them, nothing happens. When I try to open it in a different tab, it tells me to register all over again. Can you please help me?
hi rachel! maybe your browser is blocking the pdf or zip file from popping up. have you tried firefox or chrome?
Why am I unable to download the files when I click on download?
hi Phyllis! a page or a pop up should open, and you can just right click or choose “save”. 🙂
where and how can I download the templates?
hi! all downloads are in our subscribers free library, the link is in each weekly newsletter. 🙂
I can’t find the download button for the templets. Can you tell me where it is?
hi tina! the red button in our weekly newsletter and in the email when signing up will take you there! 🙂
HI, Is this website still alive? I have clicked and clicked and subscribe but I can’t find any link for the download. Is it on this page or we have to wait for the email to come? How long does it take for the email/ newsletter to be sent? sorry, I have opened more than 10 pages and I’m getting frustrated. Checked my spam folder too, nothing there.
A button at the bottom of each newsletter takes you to all downloads, And here- enjoy the dowload page https://www.apieceofrainbow.com/creative-fun/ 🙂
No templates! 🙁
A button at the bottom of each newsletter takes you to all downloads 🙂
Hi Ananda, Thank you for sharing this tutorial and tamplate. I wonder if you have the svg version of the template to use with the cricut to be able to cut and score the lines.
hi elise, i think cricut can convert the pdf to cut line. no score lines in this project, just curle the petals by hand. hope that helps! 🙂
I thought I was going mad cos I can’t findvtemplates either. HELP PLEASE as I’m desperate to try this. They are gorgeous
Hi, it’s so beautiful. Somehow I can’t find the templates for both lanterns. It says download below and them there’s nothing there. Can you tell me where they are? My daughter and I are really excited to try this! Aya.
Would love the SVG file for these as well! so cute!!
Vey interesting!
HI I have just come across your wonderful post !! I really want to make some of these for he summer. Can I ask is there an issue with health and safety for the paper white and coloured that you use alongside the candle? thanks
hi michele, the papers are non toxic. if you use real candles, just take basic cautions because there is fire. LED candles are great and much safer! =)
Hello! I’m trying to download the pattern and nothing. It keeps asking me to join the emailing list and I have. I also tried emailing the project to myself am still nothing. I really need to print the pattern out because I will be hand cutting them and I need to make 50! Help please!!
hi nery, you can find it here – http://www.apieceofrainbow.com/creative-fun/ enjoy!
So pretty and unique. I will have to try with my cutting machine.
Hi I just love those luminaries but I have a Cricut. Is it possible to just get the SVG file as I can’t cut Silhouette files They are really beautiful would love to make them, hanks
hi marty! use this and the pdf – http://image.online-convert.com/convert-to-svg
At first glance, I thought these were pinecones… a thought for the holidays?
great idea Dawn! thank you! more on the way!! =)
is there a file to down load for this candle wrap? These are beautiful. great job!
yes Liz, link is in the post somewhere! =)
Hi there, love these candles..I used to be a cardmaker and love doing paper crafts so I know I’d love this but am wondering what I could use for other templates as well, is there somewhere you got your deisgns…or could you share more designs with me?? Thanks,Lisa
thank you lisa! there’s another set on this blog if you go to DIY on the top menu. i will create more in 2015. i did try to design one for the holidays but was not 100% satisfied with how they turned out, will keep working on them! =)
: ) I got it, just double tapped on it. I was making it harder than it should have been. These mac computers are a little different.
thank you lora for sharing! this will help other mac users! =)
Bonjour, Avez- vous d’autres modèles de “paper cutting” pour lanternes?! Merci Cordialement.
So cool and beautiful! I could see one as a gift for a “crafty” friend, but also include your new template and paper as part of the gift. 🙂
Hi!!! I want to make these for gifts, but I can’t get the templates to download 🙁
try ask some friends to download it and email it to you! it works – thousands of downloads already =)
What a great article, and thanks for posting it to DIYselfies! i will add them to my queue today! i hope you will get loads of new fans!
thank you dear mia! i am so honored! =)
Ananda, i love your articles! we now feature them on our Facebook and DIYselfies pages! I hope they will bring you many new fans!
super idea. thank you so much
Beautiful ! Thanks so much of sharing these beautiful projects just in the process of making them.
when i pull the file in to the silhouette studio it only has one of the deisgns and i know there are 3 on the first and 2 on the second.
suggestions? trace?
thank you they are very beautiful!
Hi sam, the studio file has 1 design because i just moved things around to make variations according to the glass sizes. =)
love these! I am trying to download them and they download to my computer but when I try to open the silhouette one I get a message “There is no application set to open the document “dimensional-paper-apieceofrainbow.studio3”. I have a silhouette cameo and updated the software – I know I must be doing something wrong – can you help me out?
hi paige, you may need to unzip the file first – try stuffit, it’s free – then it should open! =)
I love these! I downloaded template into SIL DE but it did not trace well. Was I supposed to import a different way? TIA
hi rose, that’s what i used, & some readers have made them too, not sure why yours are not cutting right, make sure all lines are set at 0 !
I have a Silhouette Cameo and have found the perfect giveaway I’ve been looking for for my son’s wedding. Thanks for sharing!
yay! congrats! so glad to know that! =)
Very pretty, love lanterns like this 🙂
These are stunning
Oh how delightful! I just love them and looking forward to making them in all shapes and sizes. Thanks for sharing and just love your blog site. XXOO
Simply lovely and creative. excellent /
So delicate! This would be absolutely perfect on my desk!
Woww !!! Amazing…. How thick is the paper ?? How weight , 100 gr ?? Or 150gr
thank you! it’s more like 165gsm or a little heavier. i wish all the paper is labeled in gsm! =)
Merci de nous faire voir ce très bel ouvrage de décoration , très facile à faire avec un résultat magnifique ,il faut continuer à nous faire de si belles choses ,beaucoup d’imagination , merci encore . Régine
I love these lanterns, but I am not able to get them downloaded onto my Cricut Design Space, even after converting it to a SVG. Does it only work on Silhouette?
hi diane, cricut can trace pdf cut lines. if you google that, there are some good tutorials.:)
Those are so beautiful! What a great DIY! I’d love to use these for an outdoor dinner.
These are beautiful! I love that it is a fairly simple concept that creates a very dramatic look!
Wow!!! These lanterns are BEAUTIFUL! I love how gorgeous and almost 3-D like they are. I need to make some of these because I love things that glow in the night too! And, I have to laugh – because you and I have the exact same glasses. Hahaha! So, now I know exactly how mine will look provide I can cut them out right! 🙂
dear kristi that means we both have a lot of miss-match plates too haha!! xo
So pretty!! I need to make some of these!
These are really cute!
These are so gorgeous! Very simple!
These are SO cool! Definitely will be making these.
Oh my you’re amazing! They look absolutely beautiful, well done you. Mel xx
thank you mel! i so loved reading about your home on design sponge!! xo
Those lanterns are so pretty! I’m going to have to bust out my Cameo and make some of these!
thanks carly! those little machines are so fun!
Those lanterns are really pretty! I would probably butcher the job but I still might give it a try
thank you lissa! i am certain you will make some amazing ones! =)
These are so simle and gorgeous!
Those are beautiful! This will definitely be my next project!
These look gorgeous!
Merci beaucoup pour ce partage ! Les photophores sont magnifiques !
thank you so much! =)
So pretty! What a great DIY.
thank you jenn!
These are beautiful! Thank you for sharing! I am going to pin for sure.
thank you ashley ! =)
Wow, they look amazing with such simple materials!
thank you sarah! xo
These are amazing, I’m pinning this later 🙂
thank you sarah! =)
Beautiful! Totally pinned so I can try this sometime – can’t wait to see your next design!
thank you rebekah!=)
Those are awesome! I’m pinning this for later
thank you brita!
Love this will re-use small jars that hold my scented candles x
thank you elizabeth! Xo
Woah! These look so fancy!!!
These are beautiful, what a lovely and inventive idea! I’d love to see this with coloured glass shining through the paper holes!
Katie <3
thank you katie! i love colored light and will have to make one! =)
This is amazing! It looks so beautiful! Great job and thanks for sharing! 🙂
thank you dear paulina! =)
This is super cute thanks for sharing, I have bookmarked this post for future use
these are beautiful. great job!! 🙂
great idea, I love these candles they are gorgeous
Okay, this is really really cool! Great work!
thank you kendall!=)
Lovely! Nicer than candles as a centerpiece for a nice company dinner!
thank you! we’ll use them for our next company dinner =)
Easy and so fabulous! Could be cute to glue thin paper of another color on the back before cutting too…that way when they fold out, there’s a pop of color visible. Just a thought!
love love the idea cailin! it may just be my next project! =)
Great idea. Might be nice for a wedding too 🙂
hi alexa! i love weddings, especially the decor =)
A gorgeous make as always, you’re innovation is just brilliant x
emma you are so sweet!! xo
This is so neat!
thank you neely!
LOVE these! I can’t believe how easy they are to make….and they look so great!
thank you betsy! =)
I just LOVE these! Thank you for the templates – making them today!
awesome jamie! =)
I cant find the templates arghhh . HELP a woman out here please😁
hi julie, did you check junk mail? subscribers confirmation email has a button that leads to all downloads 🙂
Omg, how did you get the templates? I subscribed and verified the email, yet I cant get the templetes! Keeps going back to the subscribe page! Very frustrating. Maybe you can email them to me? Im [email protected]
This is so beautiful dear friend. I wish you had this idea for my contest :).
nice to have ya here tarun! my problem is i have ideas to keep 100 of me busy but there aren’t 100! =)
Hello, Im loving all your DIYs! Especially the paper lanterns! I subscribed, got the email, clicked the big confirmation button, looked for the templates to download and it keeps saying I have to sign up, which I did, so it says if you did subscribe there is a button on the news letter, yet on the tutorials it says you can download at the end which is a down right fib cause you or I cant! Not cool! Can you please send me the templates via email or a link to the download, PLEASE! These are so cute and i want to cut them with my cricut. I would like all 3 templates. Please please please help a fellow crafter out! Ill send or post pics later today after im done. …if I get the twmpletes that is. Thank you. Charley
They are very cool!! They look easy to make but the cutting part ….oh! Besitos
come on sofie, you can do it! =) especially knowing how talented you are! xo
Leave a Reply Cancel Reply
Your email address will not be published. Required fields are marked *
Name *
Email *
Post Comment

How To Make Beautiful Paper Lanterns for Festive Occasions
Are you looking for a fun, affordable way to add a splash of colour and culture to your celebrations? Making your own beautiful DIY paper lanterns is a great project, perfect for occasions like the Chinese Lunar New Year, birthday parties, or bringing some colourful lanterns into your home.
Creating Chinese paper lanterns is not just about crafting something beautiful; it’s about immersing yourself in a cultural tradition. These lanterns have been a staple in Lunar New Year celebrations, symbolizing bright futures and the hope that the new year brings. Plus, it’s an excellent way to recycle materials like old book pages, maps, or colourful sheets of paper.
This paper home decor craft is not just for Chinese New Year; the lanterns would look fabulous as a fun decoration. I keep my lanterns up all year round.
They can also fit in small LED tealight inside of the lantern if you want to illuminate them.
We’re a participant in the Amazon Services LLC Associates Program, an affiliate advertising program designed to provide a means for us to earn fees by linking to Amazon.com and affiliated sites. As an Amazon Associate, I earn from qualifying purchases.
Materials Needed
- Sheets of colourful patterned paper or alternatives (old book pages, maps). You’ll need a piece of paper about letter size, which should be normal-weight paper.
- Card stock (for the structure). One sheet of paper will be enough for each paper lantern craft.
- Paper for the tassel and paper bead. (can be the same as the patterned paper, or origami paper works well)
- Wooden skewer
- Hot glue gun / or glue dots
- Double-sided sticky tape
- XL Round Punch (approx 5cm)
- LED tea lights (optional)

How To Make Paper Lanterns
These Chinese lanterns are a bit more decorative than your typical paper lantern crafts; they have a lovely hanging paper tassel decoration. I will divide the tutorial into two parts: first, the basic lantern structure, and the second, the tassel decoration.
Making the Main Structure
Step 1: Begin by selecting your decorative patterned paper. You don’t want this paper to be too heavy. Book pages, old maps and patterned paper from magazines work well. Use the punch to cut about 20 discs from the paper.

Step 2: Cut the card stock paper into wide strips for the main body of the lantern, about 6 x18cm (2.5″ x 7″). Cover the side of the card stock with long strips of double-sided sticky tape. Leave the top and bottom edges tape-free.

Step 3: Fold the paper disc in half. If the patterned paper you have chosen is only printed on one side, then make sure this print is on the inside of the folded circles.
Then, stick the folded paper circles to the double-sided tape. Space them evenly about 7mm apart, leaving the last 2cm (1″) of paper and the end free. Ensure that only the folded edge of the paper circles touches the sticky tape.

Step 4: To complete the lantern body, roll the cardstock up. The overlapping double-sided sticky tape should be enough to keep it in place. But I temporarily add a paper clip to ensure good contact with the tape.

Making the Paper Tassel Decoration
Step 5: Cut a strip of lightweight paper about 6 x 15 cm (2.5″x 6″). Add a thin strip of double-sided tape to the top of the long edge. Then using scissors, fringe the paper up to the tape by cutting slits into it.

Step 6: Then roll up the paper to form a tassel. The double-sided sticky tape will hold it together.

Step 7: Make a paper bead ( you’ll find more details with this paper bead tutorial ). Cut a long triangle strip of paper about 20cm long and 1.5 cm wide at the base.

Start with the paper’s fat end and wrap it tightly around a wooden skewer. Carry on wrapping the paper around the stick and then secure the end with a dab of glue. Then, slide the bead off the stick.

Assembling the Paper Lanterns
Step 8: Cut a small strip of the same card stock you used for the lantern body about 1cm wide. Secure this to the bottom of the paper lantern using hot glue or glue dots. This paper shelf will attach the tassel to the lantern but can also hold an LED tealight.
At the same time, cut two small round discs (1cm) of card stock.

Step 9: Using glue dots (or hot glue), stick one of the small discs to the top of the tassel, then add the paper bead. Then, glue the other disc to the top of the paper bead and stick it to the bottom of the lantern.
To finish off, punch two holes into the top of the lantern and add twine for hanging.

More Paper Lantern Ideas
These unique paper lanterns are enchanting! They stand out with their decorative flair, a delightful twist on the traditional Chinese paper lantern designs.
It was such a joy rummaging through my collection of craft papers and creating a series of these lanterns to assemble into a charming decorative garland.

Whether you choose vibrant colours for a festive look or more subdued tones for a softer ambience, these lanterns are sure to add a unique charm to your decor. You could make these paper lanterns out of old book pages and old road maps for a more eco-friendly choice.

Check out this free printable if you are looking for more traditional Chinese Paper lantern templates . You might also like the Map luminary bags and these DIY tea light lanterns .
And if you are looking for more Chinese New Year decoration ideas, check out these free dragon pictures as it is the Year of the Dragon next.
Don’t forget to check out more fun adult craft ideas here.

Sunday 21st of January 2024
Your lanterns are beautiful, I especially like the bright colourful ones.
Claire Armstrong
Monday 22nd of January 2024
Thank you, I had fun going through my paper stash looking for colourful pattered paper for the lanterns.
New Upcycle Ideas 711 - Funky Junk InteriorsFunky Junk Interiors
Saturday 20th of January 2024
[…] Paper lanterns by Pillar Box Blue […]
creativejewishmom/sara
Friday 19th of January 2024
Love this, I will be using this idea without a doubt! thanks so much for sharing on craft schooling sunday, great to see you!
Thank you so much, they are fun to make. I've now got a whole garland full.
Quill And Fox
Best Design Studio

Amber Robertson
Amber Robertson is the founder of Quill and Fox. A creative writing studio that helps people find their voice and share their stories. Amber is also a published author, with her first book slated for release in 2020. She loves spending time with her family and friends, reading, writing, and traveling. When Amber was younger, she loved to write short stories and plays. But somewhere along the way, she lost touch with her creativity. It wasn’t until she became a mom that she realized how important it was to share her stories—both the good and the bad—with the people she loves most. That’s when Quill and Fox was born. Amber is passionate about helping others find their voice and share their stories. She believes that every person has a story worth telling, and it’s her mission to help them tell it in a way that is authentic and true to themselves

How to Make a Paper Lantern: A Step-by-Step Guide
Table of Contents
Paper lanterns are beautiful and versatile decorations that can add a touch of elegance to any event or space. They are easy to make, and you can customize them to fit your style and preferences. In this article, we will show you how to make a paper lantern from scratch, including the materials you need and step-by-step instructions.
Materials Needed

To make a paper lantern, you need the following materials:
- Colored tissue paper
- LED lights or a candle (optional)
You can find these materials at any craft store or online retailer. You can choose any color of tissue paper to fit the theme of your event or space. You can also use different types of paper, such as rice paper or crepe paper, for a different look.
Paper Lantern Design
There are many different designs for paper lanterns, including round, square, or cylindrical shapes. You can also add different patterns or shapes to the lantern, such as stars, hearts, or flowers. The design you choose will depend on your preferences and the occasion.
One popular design is the accordion lantern, which is easy to make and looks beautiful. To make an accordion lantern, you fold the tissue paper like an accordion and then glue the ends together. You can then add a handle and a string to hang the lantern.
There are various types of paper lanterns, each with its unique shape, size, and style. Some popular types of paper lanterns include:
- Accordion Lantern: made by folding tissue paper like an accordion and then gluing the ends together.
- Cylinder Lantern: made by rolling the tissue paper into a cylinder and then attaching a base and a top.
- Star Lantern: made by folding the tissue paper in a specific way to create a star shape and then gluing the ends together.
When choosing a design, you should consider the occasion and the space where you will display the lantern. You can also mix and match different types of lanterns to create a unique look. You can also experiment with different colors and patterns to make your lantern stand out.
Steps to Make a Paper Lantern
Follow these steps to make a simple accordion paper lantern:
- Take two sheets of tissue paper of the same color and fold them in half.
- Use a ruler and pencil to mark one-inch intervals along the folded edge.
- Cut the tissue paper along the marked lines, leaving the folded edge uncut.
- Unfold the tissue paper and lay it flat.
- Fold the tissue paper back and forth, accordion-style, along the cut lines.
- Fold the accordion in half, and then glue the two ends together.
- Cut a strip of tissue paper about 2 inches wide and 12 inches long.
- Glue one end of the strip to the top of the accordion, and then glue the other end to the bottom of the accordion.
- Tie a piece of string to the top of the accordion and hang it up.
Tips for Success:
- Use lightweight tissue paper to make it easier to fold and manipulate.
- Be careful not to tear the tissue paper while folding it.
- Apply glue sparingly to avoid making the paper too wet.
- If you want to hang the lantern outside, use LED lights instead of a candle to avoid a fire hazard.
By following these simple steps and tips, you can create a beautiful and unique paper lantern that will add a touch of elegance to any space.
Decorating Your Paper Lantern
Once you have made your paper lantern, you can decorate it to fit your style and preferences. Here are some suggestions for decorating your lantern:
- Add glitter or metallic paint to the edges of the lantern to make it sparkle.
- Use a hole punch to create patterns in the tissue paper, such as stars or hearts.
- Tie ribbons or bows around the handle of the lantern.
- Use stickers or stencils to add designs to the lantern.
- Add flowers or leaves to the top of the lantern for a natural touch.
You can also personalize your lantern by adding photos or messages to it. For example, you can add photos of the bride and groom to a paper lantern for a wedding, or add quotes or messages for a birthday or anniversary.
Making a paper lantern is a fun and easy DIY project that can add a touch of elegance to any event or space. With just a few materials and some creativity, you can create a unique and beautiful decoration that reflects your style and personality.
Whether you are planning a wedding, a birthday party, or just want to decorate your home, a paper lantern is a versatile and affordable option. We hope this step-by-step guide has inspired you to try making a paper lantern and that you will enjoy the process as much as the result.
How to Create Whimsical DIY Paper Lanterns with Nature
As an Amazon associate, I may earn a commission from any qualifying purchases (at no extra cost to you).
Lately I’ve been on a kick of using pressed flowers for all our nature crafts. These DIY paper lanterns have been on my list for a while. They look so pretty with the delicate pressed nature bits and the soft glow of light inside!
These are great for decorating an indoor or outdoor space! My little guy hung his in his room to use as a nightlight. They would also set the stage beautifully for an outdoor party at twilight or around a campfire. Or, for something extra fun, bring them along for a whimsical a nighttime walk!
Read on to see how to make some pretty DIY paper lanterns of your own!
1. Gather your materials.
Here’s what you’ll need:
- tissue paper
- all purpose flour
- permanent marker
- pressed flowers (or press your own )

2. Make your paper mache.
To get the shape of these lanterns, blow up your balloons to whatever size you’d like them to be when they’re finished. We tried some large and some small, but my favorites ones ended up being on the smaller side.
Place the balloons in some bowls with the knot side facing down. This will help hold them in place as you work. If you’d like, draw a line around the balloon for guidance as to what area your paper mache will need to cover.
Next, you’ll cover half of the balloons with paper mache to create the base of these DIY paper lanterns. Making paper mache is fairly simple, although you may need to play around with the ratio of flour to water. I used a 1:1 ratio and did 1 cup of flour to 1 cup of water. If you try this out and it seems too thick, you can always add more water until you get a consistency that feels right.
3. Cover your balloons.
Tear or cut your tissue paper into strips. Dip them one at a time into the bowl of paper mache, wipe off excess with your fingers, and begin to cover your balloons with the strips. For these DIY paper lanterns to be strong when they’re finished, try to criss cross the strips and make them go in different directions.

Aim to cover the entire portion with at least three layers of tissue paper and paper mache. I had to spot check my little guy’s balloon to cover a few spots he missed.
And make sure not to overlook the area that will make up the rim of the lanterns. This needs to be extra strong as the hole and wire for the lanterns will be going here.
My little guy absolutely loved this part as he was allowed to get super messy and dip his hands into the “goop”! And, of course, I would highly recommend covering your work space with brown paper bags or old newspapers before beginning.

4. Let dry.
After you’ve finished covering your balloons, it’s time to let these dry. For us, this took a good twenty-four hours for them to dry out completely, so plan on this being a two day project. Leave them in the bowls so that no part of the wet paper strips are touching a surface while they dry.
5. Decorate!
Once they’re dry, it’s time to decorate! But first, take a needle and pop the balloon! Now you have your lantern to work with.

Paint on a thick layer of mod podge, then stick your pieces of nature on top. Once they’re in place, paint another layer of mod podge over top to securely hold them in place.

For extra strength, make sure to paint a layer of mod podge along the entire surface of the lanterns. For this part, we propped these over top of our water bottles to make decorating easier. Once you’re done with this part, your DIY paper lanterns are almost finished!
6. Add the handle.
Punch a hole on opposite sides of your lantern. Make sure to leave a little bit of space between the hole and the top of the lantern so that it doesn’t rip too easily. To strengthen, reinforce by adding even more mod podge around the holes on the inside and out.
Once that’s dry, cut a piece of wire with your pliers to whatever length you prefer and wrap each end through the holes. Now you have a handle so that you can hang these or carry them on a walk! Place an LED tealight inside, and they’re ready to go!
Now you can decide how you’d like to enjoy your beautiful DIY paper lanterns! Whether you place them inside or out, they’re sure to add a magical touch!

Looking for more nature crafts? Check out these pressed flower necklaces !
PS – Know someone that would like this blog? Please forward it to them !

Related Posts

5 Irresistible Fall Campfire Essentials
I'm a big advocate of having festive fires year-round because each season has something unique to offer! Here are some…

5 Fun Leaf Raking Ideas to Try!
November is for raking up all those leaves that were so fun to look at in October. I know for…

6 Easy Ways to Get Outside on Black Friday
We all know Black Friday is a BIG shopping day, but have you heard of the Opt Outside movement that…
1 thought on “How to Create Whimsical DIY Paper Lanterns with Nature”

I like the helpful info you provide in your articles. I’ll bookmark your blog and check again here frequently. I am quite sure I’ll learn lots of new stuff right here! Best of luck for the next!
Comments are closed.
How To Make a Paper Lantern

After getting some requests from my readers to create a Ramadan craft, I came out with the idea of making these easy paper lanterns .
They are perfect for kids who want to help decorate their homes during these festivities.
And if you are not Muslim, you can use them as a starting point to learn about different cultures and celebrations around the world. This guide can help you explain Ramadan to your kids very easily.
These lanterns are also a great project for kids who are improving their fine motor skills, as cutting, folding, and gluing are required.
And you’ll only need very few materials that you may already have at home!
To make this craft even easier, I designed a 4-page set of paper lantern templates that you can get for free at the bottom of this post.
There are 3 different color combinations and a blank template for your kids to make their own designs. Think about stars, the crescent moon, geometric patterns, and so on.
Ready to make your own paper lanterns and start exploring new cultures?
Let’s get started!

How to Make a Paper Lantern
This craft can look a little complex, but it is pretty easy for kids aged preschool and up, trust me.
Below, I’m going to teach you how to assemble a paper lantern.
You can find written instructions with pictures and also a video tutorial where you can see how simple it is.
Once your kids understand the process, let them explore with different measurements and sizes to create other paper lanterns.
- Paper Lantern Template (Download it at the end of this post)
- White paper or cardstock
Instructions
- Print the paper lantern templates on white paper or cardstock.

- If you are using the blank template, now it’s time to let your kids decorate it as they want. You can use coloring pencils, markers, paint, or/and stickers to create your own designs.
- Once you finish decorating your lanterns, it’s time to fold the template along the dotted lines, as shown below.
Crease firmly and unfold the template. This will help your paper lantern hold its shape once assembled.

- Fold the template outwards along the line in the middle, crease well, and unfold.

- Cut out the paper lantern and the handle.

- Fold the paper lantern in half and cut along the vertical lines.

- Put glue on the tabs, fold your lantern into a circular shape, and stick the edges together.

- Finally, glue the handle on the paper lantern and let it dry.

Your paper lantern is completed and ready to decorate your home!

You can use multiple lanterns to make a garland and hang it from the ceiling.
Or, use them as centerpiece decorations with LED candles inside.
Paper Lantern Video Tutorial
If you learn better through video, watch this tutorial.
Here I show you the step-by-step process I followed to make a paper lantern.
Paper Lantern Printable Template
I created these printable templates with folding and cutting guides to make crafting your paper lantern easier.
I included 3 different color combinations: red-green, blue-red, yellow-purple, and one blank template that you can use to create your own designs.
Print as many copies as you need to decorate your home, and don’t forget to share your creations with us on Instagram by tagging @theprintablesfairy .
Let’s start making paper lanterns!
Click the link below to get the templates.
GET YOUR PAPER LANTERN TEMPLATES
*Please remember that these printables are for personal use only. You may not sell or distribute the files. If you want to share them, please link to this post and not directly to the PDF files.
More Ramadan Ideas For Kids
- Ramadan Advent Calendar
- Ramadan Play Dough Mats

Paper Lantern Ramadan Craft
2 thoughts on “how to make a paper lantern”.

Hello, I am trying to download and print your paper lantern but am unable to. Could you please help. I have made them in the past with students and love it! Thank you! Susan

Hi Susan! Thanks for reaching out. To download the files, please scroll to the last section of the post (right under the video) and click on the red link that says GET YOUR PAPER LANTERN TEMPLATES.
Leave a Comment Cancel Reply
Your email address will not be published. Required fields are marked *
Save my name, email, and website in this browser for the next time I comment.
Cookie policy
- Skip to primary navigation
- Skip to main content
- Skip to primary sidebar
Welcome To Nana's
- Paper craft
- Coloring Book
- 3-D Project
- Trip Activities
- Thanksgiving
- Fourth of July
- Father's Day
- Midsummers Day
- Mother's Day
Published: Jan 19, 2024 by Shelly · This post may contain affiliate links · Leave a Comment
How to Make Simple Chinese Paper Lanterns

Beautiful Chinese Paper Lanterns DIY
If you are looking for an easy paper craft, this Simple Chinese Paper Lanterns DIY Craft is for you! The Chinese New Year is coming up , and this would be a perfect craft project for that occasion.
Make several of them and hang them up in a garland for your very own New Years celebration!
I remember making Chinese paper lanterns when I was in grade school. We would make red lanterns from construction paper and hang them in a garland across the room. I always thought they were so pretty.
You can make your Chinese lanterns from construction paper , copy paper , or cardstock . The card stock has more body, and the lantern tends to hold its shape better, but all of them work.

Step-by-step instructions for your DIY paper lanterns
First paper lanterns diy.
The first Chinese lantern we will make will be from red copy paper and yellow copy paper (you can use other papers as well). We will use a ruler to draw out our lines to cut them and make them very accurate.
Simple instructions for classic paper lanterns can also be found on a full length video if you want that option, click here: Full Length Tutorial for How to Make Simple Chinese Paper Lanterns DIY Craft.

Drawing lines as cutting guides
Fold your red piece of 8 ½ x 11 inch copy paper in half hotdog style.
Take your ruler and draw pencil marks down the entire length of the folded edge of the paper at half inch increments.
Draw a pencil line the length of the paper on the unfolded side that is about ¾ to 1 inch from the edge.
Then, along that line, make marks that are in half inch increments all the way down the paper.
Turn your paper so that you can use the ruler to draw straight lines that connect the marks that you’ve made at the half inch increments. You will draw the lines from the unfolded edge to the line that you drew down the unfolded edge.

Cut along the pencil lines
Now take your scissors and cut along those lines through both layers of your paper . You will cut strips from the unfolded edge just to the line that you drew on the opposite side of the paper. Because you measured the lines they will be very accurate and even.
When you open your paper, you’re going to roll it, so that the two short edges come together.
Using a glue stick , put glue along the last strip on one edge. Then overlap the last strip of the other edge and glue them together.
The shape is so simple, but I always think it is so pretty.

The lantern's handle
Next, you’re going to cut a handle for your lantern.
Cut a strip of paper from the red paper along one short side that’s about 1 inch wide.
Use a glue stick , double-sided tape, or staple the two ends of that handle to the top of your lantern, making them as evenly across from one another as possible.
Making a paper lantern liner
We are going to add an extra step to the lantern and make a liner that goes inside.
Take a piece of your yellow copy paper folded in half hamburger style.
Place the folded edge to the right, and then cut fringe all along the bottom edges of your paper through both layers. These will be small clips that you cut in the paper that are about 2 inches deep and as close together as you can make them- about an eighth of an inch or a quarter inch apart.

After doing this, open your paper up and roll it so that the fringe is on the bottom. You’re going to glue this into a tube. You want to glue it so that you have about ¾ of an inch overlap. We’re going to be slipping this tube inside of the lantern, so it needs to be able to fit through the bottom of the lantern.
With that done, the next step is to slip the yellow tube into your lantern so that the fringe is at the bottom of the lantern.
Line up the top edge of the tube with the top of the lantern, and then staple it once to hold it in place.
Push the lantern upwards so that the fringe shows out of the bottom of the lantern. Staple it once so that it stays in place.
I love the way this looks! It makes the lantern look as if it’s lighted on the inside !

Extra decorations for your lanterns (optional)
Our last step is to decorate the lantern however you would like.
I cut a half inch strip along the long edge of a yellow sheet of copy paper. Glue the strip on the outside of the lantern, around the top of the paper, right below the handle.
- You can decorate the lantern in other ways- you could use washi tape, a gold paint pen, gold ribbon, or glitter glue for example! Use your imagination!
You’re done with your own Chinese lantern craft!

Second paper lanterns DIY
If you would like, you can also make your lantern without the inside tube. In the video I show making these traditional lanterns. In this option I use red card stock paper.
Also, I do not measure and draw the lines to use to cut the strips. Just fold the piece of card stock in half hotdog style and then make snips, cutting the strips until you get about an inch from the unfolded edge. Keep cutting the strips the full width of the paper
Without measurement lines , do your best at making the cuts as straight and even as possible.
If you would like for younger children, you can cut wide strips- even up to a 1-inch strip. This craft is a good learning experience for them in cutting and is a fun way to develop fine motor skills. But I must say that the narrow strips make for a more delicate looking paper lantern.
Assemble the lantern as we did earlier. I stapled mine this time.
Go ahead and add the handle and decorate as you’d like. This is the way we made them in grade school, we just left them without a liner.

Making a paper tassel (optional)
It is fun to make a paper tassel to hang from your lantern.
Cut a 2 ½ inch strip of yellow paper down the long side of the paper.
Fold this in half and cut small snips into the paper close together- cutting from one edge to about ½ inch from the other edge of the paper. This will be the fringe.
Place glue along the ½ inch side that is not clipped.
Tightly roll the fringe up into a tassel. Isn't that cool?
Cut a piece of thread , string , or embroidery floss that is about 2 feet long. Tie the thread to the top of the tassel so there are two equal lengths of thread on either side of the tassel.
Tie the ends of the threads to to the handles of the lantern, one to each handle. The thread needs to be long enough so that the tassel hangs down underneath the lantern.
This adds a great finishing touch !

Third paper lanterns DIY
i can make a paper lantern in miniature too what.
Up for another option? How about some miniature Chinese paper lanterns? Who can resist a miniature?
Fold another red rectangular sheet of paper in half hotdog style and cut down the fold so that you have two pieces of paper.
Fold one piece in half hotdog style and clip your strips down into the paper cutting from the folded edge to about a half inch from the unfolded edge.
I cut off about 2 ½ inches from one end of the paper to make it a little smaller in length.
Assemble your lantern just the way we did the larger ones.
I loved the way the miniatures turned out . I think they would look so neat on a garland. Perhaps you will come up with ideas for your own design for a lantern!

Make a paper lantern garland- so cool!
I actually went ahead and strung all of my finished lanterns together into a garland by putting a string through the handle of the lantern.
The smaller and larger lanterns were alternated and I liked the different shapes and sizes. What do you think?
The lantern craft is a great one, for any ages of kids, even you!
What is the story behind the Chinese paper lanterns?
Chinese lanterns have a long history. There are written records that the tradition of making lanterns began during the eastern Han dynasty in 25-220 AD! That's a long time ago!
At one time the lanterns were made and then carried to the palace (a palace lantern), later they were made to be released and float up into the night sky.

Different colors of lanterns have different meanings-
- blue paper is for sadness when things are not going well, perhaps someone is sick
- white paper is for mourning and lets others know that someone has died
- yellow paper is for good luck and some times students will hang them as help for their schooling and tests
- red paper is for celebration and stands for prosperity, wealth, and fame.
Since red symbolize prosperity, a red traditional Chinese paper lantern (or one made from silk) is hung for weddings, the birth of a baby, or special festival days.
Lanterns are made in various kinds of shapes and sizes. They can be made to hang from a cord, float into the night sky like a hot air balloon, or float on the water.
Chinese New Year and the Chinese Lantern Festival
But the practice caught on and over time evolved into a big celebration called the Chinese lantern festival.
The lantern festival falls on the last day of the celebration of the Chinese lunar new year. Lunar means that the date is set by the phases of the moon. So the new year begins with the new moon in January or February and the celebration ends 14 days later at the time of the full moon.
Red colorful lanterns are used during the entire Chinese New Year activities. Homes, streets, and cities are decorated with beautifully decorated Chinese lanterns.
People return home to celebrate with family and exchange red envelopes of money as gifts. There are wonderful Chinese meals together and parties with firecrackers and dragon dances.
The lanterns are featured in the Chinese lantern festival.
A cool tradition is writing "lantern riddles" on them for others to figure out and solve! Doesn't that sound fun? Maybe you should add a riddle to your Chinese New Year craft lantern!!
I liked the information on this site about Chinese lanterns and Chinese New Year: Lunar New Year- National Geographic
Don't forget there is a full length video on YouTube if you want to follow along step-by-step with Nana! Full Length Video Tutorial on YouTube for How to Make Simple Chinese Paper Lanterns DIY Craft.
Want more easy paper crafts for kids?
Check out these fun and easy paper crafts for all seasons and occasions!
- Handmade Paper Envelopes 3 Ways
- How to Make Paper Pinwheels
- How to Make a Paper Strip Pumpkin
- 4 Adorable & Easy Paper Penguin Crafts
- Easy Paper Fan Scene Craft
If you try this craft, let me know! Go ahead and leave a comment, rate it, and tag a photo with #WelcometoNanas wherever you post.
Come join the fun at https://welcometonanas.com
Supplies for Simple Chinese Paper Lanterns DIY Craft
- Paper- card stock , construction paper , copy paper (red and yellow, or colors of your choice
- Thread , string , or embroidery floss (optional)
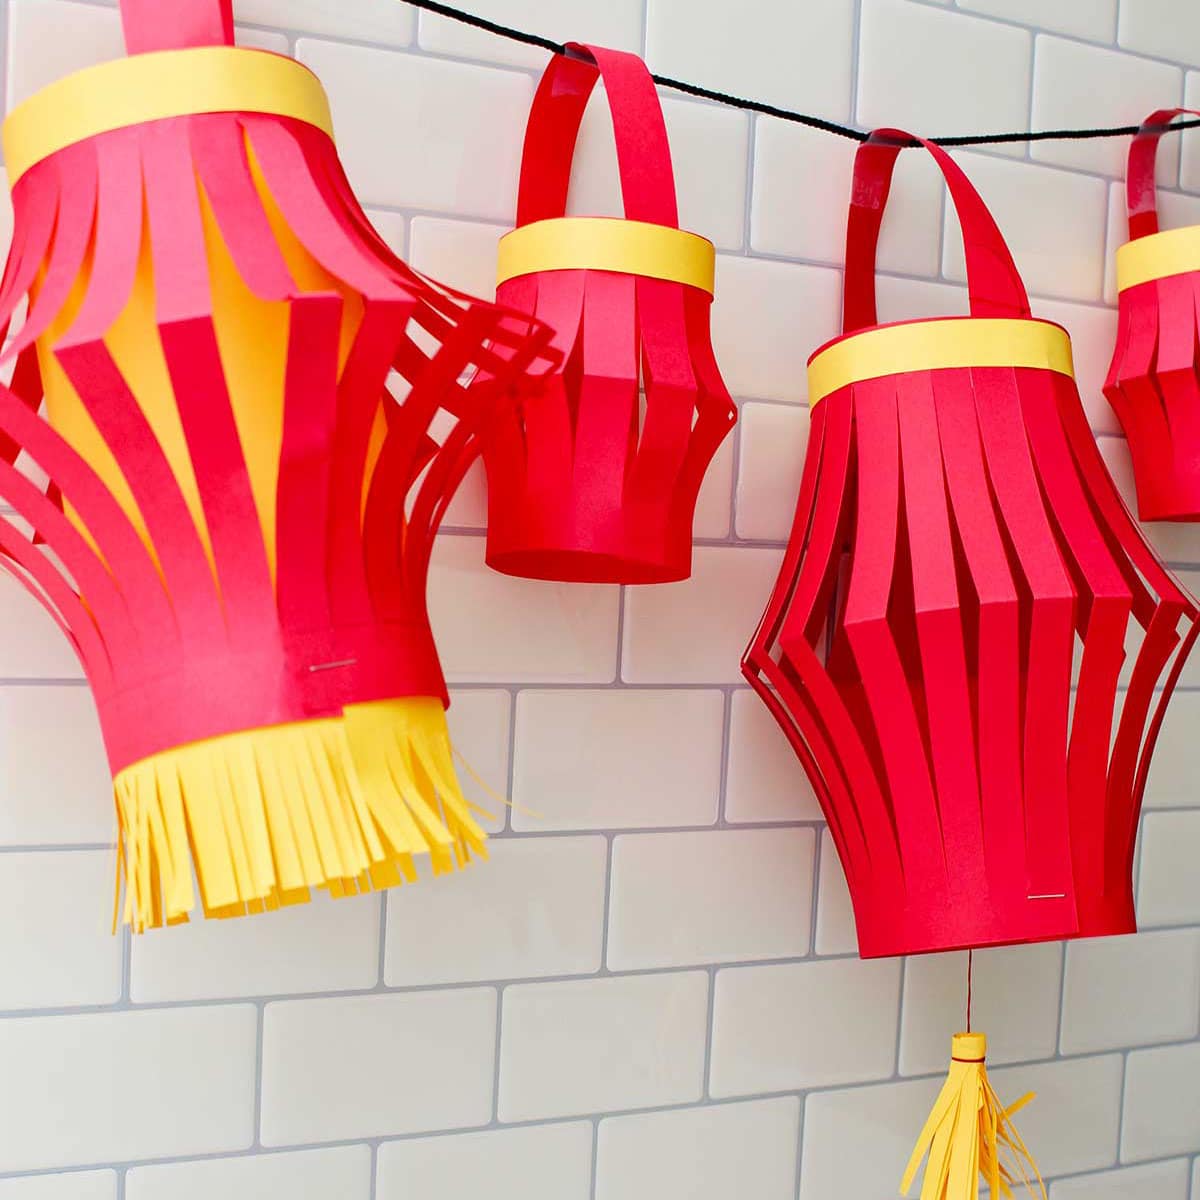
How to Make Simple Chinese Lanterns DIY Craft
Items Required
- Paper- card stock , construction paper , copy paper red and yellow, or colors of your choice
- Ruler optional
- Thread , string , or embroidery floss optional
Instructions
- The first Chinese lantern we will make will be from red copy paper and yellow copy paper (you can use other papers as well). We will use a ruler to draw out our lines to cut them and make them very accurate. Simple instructions for classic paper lanterns can also be found on a full length video if you want that option, click here: Full Length Tutorial for How to Make Simple Chinese Paper Lanterns DIY Craft. Fold your red piece of 8 ½ x 11 inch copy paper in half hotdog style. Take your ruler and draw pencil marks down the entire length of the folded edge of the paper at half inch increments. Draw a pencil line the length of the paper on the unfolded side that is about ¾ to 1 inch from the edge. Then, along that line, make marks that are in half inch increments all the way down the paper. Turn your paper so that you can use the ruler to draw straight lines that connect the marks that you’ve made at the half inch increments. You will draw the lines from the unfolded edge to the line that you drew down the unfolded edge.
- Now take your scissors and cut along those lines through both layers of your paper . You will cut strips from the unfolded edge just to the line that you drew on the opposite side of the paper. Because you measured the lines they will be very accurate and even. When you open your paper, you’re going to roll it, so that the two short edges come together. Using a glue stick , put glue along the last strip on one edge. Then overlap the last strip of the other edge and glue them together.
- Next, you’re going to cut a handle for your lantern. Cut a strip of paper from the red paper along one short side that’s about 1 inch wide. Use a glue stick , double-sided tape, or staple the two ends of that handle to the top of your lantern, making them as evenly across from one another as possible.
- We are going to add an extra step to the lantern and make a liner that goes inside. Take a piece of your yellow copy paper folded in half hamburger style. Place the folded edge to the right, and then cut fringe all along the bottom edges of your paper through both layers. These will be small clips that you cut in the paper that are about 2 inches deep and as close together as you can make them- about an eighth of an inch or a quarter inch apart. After doing this, open your paper up and roll it so that the fringe is on the bottom. You’re going to glue this into a tube. You want to glue it so that you have about ¾ of an inch overlap. We’re going to be slipping this tube inside of the lantern, so it needs to be able to fit through the bottom of the lantern. With that done, the next step is to slip the yellow tube into your lantern so that the fringe is at the bottom of the lantern. Line up the top edge of the tube with the top of the lantern, and then staple it once to hold it in place. Push the lantern upwards so that the fringe shows out of the bottom of the lantern. Staple it once so that it stays in place. I love the way this looks! It makes the lantern look as if it’s lighted on the inside !
- If you would like, you can also make your lantern without the inside tube. In the video I show making these traditional lanterns. In this option I use red card stock paper. Also, I do not measure and draw the lines to use to cut the strips. Just fold the piece of card stock in half hotdog style and then make snips, cutting the strips until you get about an inch from the unfolded edge. Keep cutting the strips the full width of the paper Without measurement lines , do your best at making the cuts as straight and even as possible. Assemble the lantern as we did earlier. I stapled mine this time. Go ahead and add the handle and decorate as you’d like. This is the way we made them in grade school, we just left them without a liner.
- It is fun to make a paper tassel to hang from your lantern. Cut a 2 ½ inch strip of yellow paper down the long side of the paper. Fold this in half and cut small snips into the paper close together- cutting from one edge to about ½ inch from the other edge of the paper. This will be the fringe. Place glue along the ½ inch side that is not clipped. Tightly roll the fringe up into a tassel. Isn't that cool? Cut a piece of thread , string , or embroidery floss that is about 2 feet long. Tie the thread to the top of the tassel so there are two equal lengths of thread on either side of the tassel. Tie the ends of the threads to to the handles of the lantern, one to each handle. The thread needs to be long enough so that the tassel hangs down underneath the lantern. This adds a great finishing touch !
- Up for another option? How about some miniature Chinese paper lanterns? Who can resist a miniature? Fold another red rectangular sheet of paper in half hotdog style and cut down the fold so that you have two pieces of paper. Fold one piece in half hotdog style and clip your strips down into the paper cutting from the folded edge to about a half inch from the unfolded edge. I cut off about 2 ½ inches from one end of the paper to make it a little smaller in length. Assemble your lantern just the way we did the larger ones.
More All Posts

Reader Interactions
Leave a reply cancel reply.
Your email address will not be published. Required fields are marked *
This site uses Akismet to reduce spam. Learn how your comment data is processed .


How To Make A DIY Paper Lantern Arch

This DIY paper lantern arch makes the perfect entry for a party or backdrop for a photo op or candy buffet. And unlike balloon arches, it can be made days or weeks ahead of time.

I think all parties should have a dramatic entry.
And one of my favorite ways to do that is by putting up an arch that everyone has to walk through to get in.
When I was decorating for my Beetlejuice party , I wanted one that was black and white stripes to go with theme.
But didn’t want to use balloons because they can’t be put up much before party time. (And I never have time the day of the party to be fiddling with this kind of stuff).
So I decided to make an entry arch out of paper lanterns.
Like balloons, you can buy them in whatever color you need to go with your decor.
But they’re easier to assemble than balloons, stay up as long as you want them to, and they’re re-usable.
And the finished paper lantern arch looked just as good as I was hoping it would!
This post may contain affiliate links. We make a small commission if you buy the products from these links (at no extra cost to you). As an Amazon Associate, I earn from qualifying purchases. But we only recommend products we would use ourselves. For more information, click here to see our disclosures
- 3 packages of 24 black paper lanterns * in assorted sizes
- 3 packages of 24 white paper lanterns * in different sizes
- 2 packages of 12 assorted Halloween paper decorations * (I only used the paper lanterns for the arch)
- 2 packages of 12 black and white large paper lanterns *
- A backdrop stand (preferably with adjustable height poles) – You’ll need the two side posts but not the top of a backdrop stand for this project. I like to use this heavy duty one * because the base is flat and heavy so people won’t trip over it and it’s very sturdy. If yours isn’t that heavy, you may need to add sandbags or some other weight on the base to keep them from moving. It’s also easier to assemble the arch if the posts are an adjustable height.
- 8′ of flexible copper pipe * – We’ll bend this into the top part of the arch. It’s very easy to bend but maintains its shape so it’s perfect for this kind of project.
- 20′ of plastic chain * – I attach the paper lanterns to this chain instead of directly to the arch because it keeps them from sliding down. You can use any type of chain, but I like the plastic because it is lighter than metal.
- 2 zip ties *
- Wire snips – to cut the chain and flexible pipe to length
How to make a paper lantern arch
1 | assemble the arch frame.

Cut a 6 to 8 foot section (depending on how high you want the arch to be) of the flexible copper pipe using wire cutters, pipe cutters or a hack saw.
Use your hands to bend it into a half circle shape.
Don’t worry if it’s not perfectly round. You won’t notice the wiggles after the paper lanterns have been attached.
Position your backdrop stand poles wide enough apart for the arch to reach both of them. This should be at least 3½ feet if you want people to walk through it.
Make sure that posts are lowered so you can easily reach the top of them. This will make adding the lanterns to the top of the arch much easier.

Stick each end of the arched pipe into the top of the backdrop pole.
If your poles are not open at the end, you can either pop off the plastic piece on the top. Or bend the copper tubing so it fits through the hole on the side where the horizontal bar usually goes.
2 | Add the chain

Starting from the top of the arch, loop the chain around the copper pipe and down the poles in both directions.
You’ll need to start about 10 feet from the end of the chain so you have enough.

Make sure you have enough extra chain on both sides to cover the length of the poles when it is extended all the way up. (It’s better to have too much chain than not enough since you can always cut it off later).
I usually don’t cut it until after I have attached all of the balloons so I know it will be long enough.
3 | Assemble the paper lanterns
Put together a bunch of paper lanterns.
To do this:
- open the paper lantern
- insert the flat side of the metal frame into the round metal loop at the bottom of the lantern.
- bend the frame slightly and insert the two bumps at the top of it into the loops at the top of the paper lantern.
It’s hard to know exactly how many paper lanterns you will need since it depends on what sizes you use and how tightly you pack them in.
So you don’t need to assemble them all up front if you think you’re going to have some left over. You can always make more later if necessary.
4 | Attach lanterns to the top of the arch

Starting from the middle of the arch again, use the hook at the top of the paper lantern to hook them onto a link in the plastic chain.
I find starting from the top of the arch makes it easier to have a symmetrical look when you’re finished.
And if you have poles with adjustable height, you can decorate the arch at a lower level where you can reach it easily. Then lift it up to the correct height when you’re ready to do the sides.

To make it look like a balloon garland, attach 5 to 7 paper lanterns in a group with the hooks close together on the chain.
Using different-sized paper lanterns in the group helps to make it more interesting.

I usually start with one large one, 2 medium ones and 2 to 3 small ones.
Then add 1 or 2 other lanterns to vary the grouping size.
From there you can add another group of the same color or switch to a different color depending on how you want it to look.

For my Beetlejuice theme, I was trying to make black and white stripes so I alternated the colors.
For more of a color block effect, you’ll want to put at least 3 groups of the same color together.
Follow these hints to create a natural looking arch:
- Each time you put up a large paper lantern, try to change the side of the arch it is on.
- Save the smaller lanterns for last and use them to fill in the gaps.
- Striped or patterned lanterns are useful for transitioning from one color to the next, and for adding texture to large monochromatic sections.
6 | Add lanterns to the sides

After you have attached the lanterns across the top of the arch and part way down the sides, raise the backdrop poles so that the arch is as high as you want it.
Wrap the remaining chain around the bottom of the poles.

Finish covering the sides of the arch with more lanterns.
5 | The finishing details
Cut off the chain at the bottom of the arch.
Zip tie the last link on each side to the pole so it doesn’t move around.
Fill in any gaps in the arch with small paper lanterns.
If any parts of the arch look a little lopsided, try swapping some of the larger lanterns for smaller ones and vice versa until it looks more even.
The finished arch

The finished arch makes a great entrance to a party (like the black and white one I made for my Beetlejuice party.)
It creates a statement that sets the tone for the rest of your decor.
Hanging more of the paper lanterns from the ceiling draws your eyes into the room.

Adding lights around the arch makes it stand out even more.
Other party ideas you might like
- Beetlejuice party ideas
- Wow factor party ideas
- DIY large paper flowers backdrop
Have comments or questions about our DIY paper lantern arch? Tell us in the section below.
Sharing is caring!
Leave a Reply Cancel reply
Your email address will not be published. Required fields are marked *
Notify me via e-mail if anyone answers my comment.
This site uses Akismet to reduce spam. Learn how your comment data is processed .
One Comment
Thank you so much!!!

Make Paper Star Lanterns to Brighten Up Your Nights!

Share the love!
See how to make gorgeous paper star lanterns that cast a magical glow with lovely star and snowflake cut-outs!
I love making paper lanterns! So much so, in fact, that a couple of years ago, I made a paper lantern or luminary for every month of the year and I’ve also created a very pretty heart paper lantern too! And this is the perfect season for paper lanterns — they cheerfully light up our homes on those long, dark winter nights. You can also make these in other colors, like red, white, and blue, for the summer! Let me show you how to make paper star lanterns !
Want to save this project? Enter your email below and we’ll send the project straight to your inbox.
See exactly how to make this beautiful paper star lantern in this tutorial video below (or keep scrolling if you prefer a step-by-step photo tutorial):
Here are the star lanterns I made for the holidays!

And here’s a red, white, and blue paper star!

You can even make them for the fall and Halloween!

I’m eager to show you how to make paper star lanterns! This post contains some affiliate links for your convenience (which means if you make a purchase after clicking a link I will earn a small commission but it won’t cost you a penny more)! Read my full disclosure policy .
Quick Links to Information in this Post
Materials to Make a Paper Star Lantern
- 8.5″ x 11″ 100-110 lb. cardstock (I used red , blue , and silk white ) or poster board (I used Cricut foil holographic posterboard )
- (Optional) 8.5″ x 11″ vellum
- (Optional) Hanging lantern cord for pendant lighting
- (Optional) 40-Watt LED Light Bulbs
- A way to glue your paper star lantern, such as hot glue , precision art glue , or spray adhesive (useful if you use the vellum layer)
- A way to cut your cardstock ( I used the amazing Cricut)
- Design #168 – My free SVG/DXF/PDF cut file/pattern for the shadow box template (available in my free resource library —get the password at the bottom of this post)
How to Make Paper Star Lanterns
Step 1: get my free paper star lantern file and pattern..
Download the free paper star lantern pattern ( Design #168 ) from my free resource library (get the password to the library in the form at the bottom of this post).
Step 2: Cut your paper star lantern pieces.
You can cut this paper star lantern with a good craft knife, and I’ve included a PDF if you’d like to do that. I cut these on my Cricut cutting machine because it is so much faster, so let me show you how to do that!
First, upload the paper star lantern SVG file to Cricut Design Space and place it on your canvas.
If you’re not sure how to upload an SVG cut file to Cricut Design Space , watch this helpful video training series I made . If you’re on an iPhone or iPad, here’s how to download and upload SVG files to the Cricut Design Space app .
Here’s what my paper star lantern SVG cut file looks like uploaded to Cricut Design Space : Please note the size is 23.532 inches x 17.85 inches.

And here’s what the paper star lantern with the snowflakes SVG looks like in Cricut Design Space:

Decide if you want to cut the vellum layer out. The vellum will diffuse the light which gives your paper star lantern a nice glow and disguises the light fixture inside, but the lighting effect of stars and snowflakes cast on walls won’t be as pronounced with the vellum included. You decide which one you like best — the vellum layer is optional for both paper star lanterns. If you decide not to use vellum, hide or delete that layer (the white triangles).
When you’re ready, click “Make It” — there is no scoring, grouping, or attaching required for this project!
I recommend you cut this project from 100 lb. or 110 lb. cardstock or poster board if you want to hang a light inside it. This hanging paper star lantern needs to be sturdy enough to support itself, and this material works the best. For material settings, use the “glitter cardstock” setting as that will give you two passes and cuts cleanly.
Step 3: Assemble your paper star lantern.
A. Prefold each dashed angle of each of the five paper star lantern pieces, including the long side tab.

B. Prefold the bottom of the two tabs in the opposite direction from how you folded it in step A. Be sure to fold all five pieces in the same manner.

C. If you are including the vellum layer, s pray the inside of each of the five paper star lantern pieces with permanent spray adhesive. Then p lace the vellum on the top of the sections of each star lantern piece. Let dry completely before continuing.
D. Identify the star point piece with a crescent missing at its point and set it aside for now.
E. With the other four pieces, place glue along the long side tab, glue the tab to the inside of the other side to form a point. Be sure that the pieces align flush. Repeat for all four pieces. This will give you four star points.

F. Place glue on one side of the bottom tab of one star point and g lue another star point to the other side of the light fixture tab, working your way around until the four assembled star points are glued together.

G. Pick up the piece you set aside earlier and glue the shorter tabs to the main star assembly — you’ll need to reach inside to press the layers together as the glue sets.
H. If you want to light up your paper star lantern, p lace the light fixture inside now with the cord sticking out the end of the unglued point. Carefully glue the long tab in place to close up your paper star lantern. T he last piece is a bit fiddly, so time and care should be taken when assembling. Go slowly and be patient with yourself.
When you’re done, hang your paper star lantern from the pendant cord!

Get my free paper star lantern SVG cut files and patterns
If you make paper star lanterns, we’d love to hear about it! Please share your photo in our Facebook group , email it to me at [email protected] or tag me on social media with #jennifermaker.
See all of the projects, tutorials and free designs in The Great Maker 25-Day Gift-Away Challenge!

Want to remember this? Save the DIY Paper Star Lantern Tutorial to Your Favorite DIY Pinterest Board!

Jennifer Marx is a designer, an enthusiastic crafter, a lifelong teacher, and a proud overcomer of a variety of life's challenges. In her spare time she loves to play D&D and video games, garden, sew costumes, and go to Disney. She lives a full, happy life in beautiful Ann Arbor, Michigan with her partner Greg, her daughter Alexa, their two dogs, Hunter and Chloe, and their sassy orange cat, Butterscotch.
Similar Posts

Craft Vinyl Storage Tower – DIY Vertical Organizer for Vinyl Rolls

Make Crepe Paper Peony Flowers That Look Real!

Custom Shadow Box: Make Your Own in Cricut Design Space

DIY Gift Bags – Three Styles Made With or Without a Cricut!

How to Sew a Round Jewel Neckline Easily!

3D Tree with Paper Ornaments – A Whimsical Holiday Decoration
16 comments.
I love this! My youngest has special needs and loves Christmas, so he has his own small tree in his room and he picked this for me to tweak to be his tree topper. How big is the finished star? I would appreciate an idea how much I need to shrink it down. Thanks for the fabulous idea!
I’m new to the cricut, but I’ve been looking through your files and your tutorials. OMGeee! I’m so excite to try these! Thank you. I had no idea what I was going to make with this expensive toy and I’m feeling much better now.
Will I have to open up the paper when I need to change the lightbulb?
LOVE these. I have a friend who is having a baby and is doing a twinkle twinkle little star theme. My question how or what would you suggest to use to just have one of these on a dresser top to light up sitting there, not hanging?
What a cute idea and I bet you would get some great suggestions posting in my Cricut Crafters & Makers Group !
Hi Jennifer, where did you get the pendant lights? Thank you for sharing your amazing talent!
Hi Debra! You will want to check out the materials list towards the top of the blog post to see where I got everything to create my stars. Hope this helps!
I love this. My first try I wanted to make the snowflake and I thought the dimensions for the them were the same as the star that are listed in the tutorial Right above the screenshot of the yellow star in design space. 23.53.2 X 17.85 – Unfortunately that didnt work one side was longer than the other when I tried putting it together. SO I then watched the video and it showed 20.622 H 11.553 – I hope that is it, This time I will do a tester before I cut it all. I just wanted to know if it is just me or if this should be updated in the instructions.. thank you so much I Love your crafts!
Hi Karina! The dimensions are different. If you are using an iOS device I do give you the dimensions to increase it to.
Oh thank you Yes I was using an IOS. I must have missed those dimensions. Either way it is beautiful and I got it done 🙂
Could the light bulb catch the Star Luminary on Fire? I Love the Design!!! It’s so Beautiful.
Hi there! Not with the bulb we are using! We will always put safety first!
Hi Jennifer These Stars are so Beautiful!!! So Amazing!!!! I was Wondering if i put up three Star Lanterns at different heights, where do all the cords go so it doesn’t look messy. I keep imagining cords all down the walls. Do you have any ideas so I don’t have 3 cords running down the wall in three different spots? Thanks so much, Viv
Thank you, these can add such a pretty touch to your room! The cord is only there to help hang them, so you wouldn’t have anything running down the wall. And if you don’t want to hang them you don’t need the cord at all! A little tea light inside is what adds the light. They’re so versatile!!
jennifer i uploaded the paper star lantern svg the file folder contains 2 one says light and separated the other file does not. which one am i to use i have a maker and am using my laptop
The image in my blog tutorial shows the one that is not separated. I include both so that they are easy to see separated, but if you want to follow my tutorial exactly, you’ll want the one that does NOT say separated! Good luck, this is such a pretty project when it’s all finished!
Leave a Reply Cancel reply
This site uses Akismet to reduce spam. Learn how your comment data is processed .

Create A Cute DIY Square Paper Lamp With Items You May Already Have
Paper lanterns are a beautiful and distinctive way to add ambient light to a room or outdoor space. Often appreciated for their whimsical style in Asian cultures, you will find them in homes, eateries, and decoratively adorning streets and festivals. Paper lanterns are a relatively inexpensive way to decorate your own home, whether you are entertaining or just enjoying their soft light on your own. Instagram user @artistsuniversum recently showed a great DIY hack for creating custom and distinctive paper lanterns using wooden chopsticks, hot glue, napkins or paper towels, and water-based markers.
The result is a distinctive and creative DIY paper lantern that is perfect for stringing up indoors or out or using as a stylish centerpiece. Because these creative lanterns are budget-friendly to create from common materials in the home, you can make several. They are also a great activity to do with children, creating one-of-a-kind works of lighted art.
Read more: 6 Helpful Ways You Can Upgrade Your Toilet
Creating A DIY Paper Lantern
Begin by laying out your chopsticks or wooden dowels in the shape of a rectangle and securing the corners with hot glue to hold them together. Cut a napkin or paper towel to the same size as the frame, with enough to wrap and glue around the edges. Use a water-based marker to create your own design, using a brush and additional water to guide the color spread into the paper. The watery ink will soak into the paper creating a soft water-color inspired image. Create four frames and images and then secure them together in a cube shape with glue.
Create a criss-cross with additional sticks or dowels to add support and a base inside, then place battery-operated twinkle lights inside to illuminate the lantern. If you want to hang your lantern, use some wire or string attached to the corners with more glue. The lanterns will also sit on the legs created by the chopsticks. While the paper is flammable and, therefore, not ideal for candles, you can also use flameless LED candles inside as an alternative to string lights.
Read the original article on House Digest .


How To Make Japanese Paper Lanterns
Whether you are interested in Asian interior design or want to make something fun, then a Japanese paper lantern is a great choice. Not only does it make a great craft project, but it is usable too.

Adding a Japanese paper lantern to your room can add a feeling of zen. They allow a soft glowing light to fill the room, which is very relaxing to experience.
If you are wanting to make a Japanese paper lantern, then look no further. Here is an easy step-by-step guide on how to make your own.
Before You Get Started
While traditionally you should use a real flame to light this kind of light, you may not want to risk causing a fire inside the home. If you do plan to use it indoors, or even hung on the exterior walls of the home, use a candle alternative.
A flame may set the paper alight which is never a great experience. It also ruins your craft project. You can place a bunch of cute lights inside the light. These are the lights that you would use on the Christmas tree or inside the home.
You can also purchase fake tea lights and candles that have a flickering effect. If you do plan on using a real candle or tea light, always make sure it is fixed securely on the inside. Also never use a candle when there is wind.
What You Will Need To Make A Japanese Paper Lantern?
Here are the things you will need for the project:
- Tissue or rice paper
- Size 20 gauge wire – it needs to be strong yet flexible to work with
- Wire clippers
- Glue for paper use
- A mold for the lantern
- A form of light
- Decoration (if needed)
Step-By-Step: How To Make A Japanese Paper Lantern
Here is an easy step-by-step guide to help you create a beautiful Japanese paper lantern to use in your own home:
Before you begin, you will need to find a mold to place the wire on. One easy way to do this is by using a baby formula tin, as it often produces the correct size. However, you can also use a vase, or even a bowl.
No matter what, you will find something to use within the home. Experimentation is often key when it comes to crafting! It also depends on the size you are going for. A bowl will produce a rounded shape, while the baby formula will produce a longer size.
Wrap the wire from the bottom of the mold and then work your way up. Leave the same space between each tier too. You will need to do this until you reach the top of the mold. Never cut the wire and instead leave it on the spool.
You can then cut off the excess wire. However, leave some length at the end of the wire.

Remove the wire off the mold. It will likely all squish together, so you will need to reshape it. At first you might find this tricky, but persevere!
At the top of the lantern, use the extra wire to create a handle. Make a loop and then wrap the extra wire to the other side. At the bottom of the lantern, use the extra wire to wrap around each of the tiers.
Start from the bottom and loop the wire around each tier to create a straight line going up. Once you reach the top of the lantern, twist it around to secure it in place.
Now is the time to create the outer shell. Depending on the shape and size of the lantern, cut panels out of the paper, but always make them bigger. They will need to overlap.
Glue the top end of the paper to the top of the lantern. Stretch it over the tiers and glue it to the bottom of the lantern. Do the same to the next paper panels and overlap each one slightly to avoid gaps. Glue the overlapping too, but always wait for panels to dry first.
This last step is completely optional. You can then go on to decorate the rest of the paper lantern if you feel the paper isn’t enough on its own.
Tips On Making A Japanese Paper Lantern
- When making the frame, make sure that you do it in such a way that you can remove the inner object. If you do not, you risk trapping it inside the wired frame. When this happens, you will not be able to use it as a light, and it may be too heavy to hang somewhere.
- Always be aware of the thickness of the paper that you use. The thinner it is, the easier it may be to accidentally tear. However, you will want it to be thin enough that light flows through it easily. Try to go for a medium thickness to start with.
- The glue you use should be suitable to use on paper and not too wet. If the paper begins to crinkle up, then you will need to swap to a different glue. If you are unsure of the effects when it comes to your glue and paper, always do a trial first.
- As you wrap the wire around the object to create the final shape, always leave equal room between each one. You will want the shape to look symmetrical throughout, without any weird dips.
Final Thoughts
Making a Japanese paper lantern is a great way to add some zen inside your home. It also means you can create an Asian feel within a room too, or work on a craft project that you can use. Just remember to always keep in mind how you are going to light it.
These days you can buy fake candles which have a flickering effect. Nobody needs to know that the flame isn’t real. Plus, it is much safer.
- Recent Posts

- 16 Best Websites To Watch Japanese Movies With English Subtitles - May 11, 2023
- Is ZIPAIR The Best Airline For Traveling To Japan? - May 11, 2023
- Ryu Murakami Vs Haruki Murakami – Which One Should You Read? - May 11, 2023
Related Posts:

IMAGES
VIDEO
COMMENTS
To make a paper lantern, you'll need a rectangle-shaped piece of paper, scissors, and tape. First, cut a 1-inch (2.5-cm) wide strip off of one of the short ends of the paper for the handle and set it aside. Then, fold the paper in half lengthwise. Make evenly spaced cuts into the folded side of the paper that go almost all the way to the open ...
Make sure the light is pointed to shine in the direction of the paper, so it illuminates the inside of the lantern when it's assembled. 6. Slowly wrap the vellum around the puck light, keeping the vellum's edge flush with the edge of the light. This is important, so the lantern sits correctly. 7.
Instructions. Gather all your supplies to get started on this project. Turn your craft paper over with the right side facing down. Using a pencil and a ruler, draw two lines—one each at the top and bottom of the paper about a centimeter away from the edge. Next, make markers at every centimeter gap along both lines.
One (1) sheet of 65 lb cardstock, 8.5 x 11″ (even glitter cardstock for the hearts design or different colors) or 12″ x 12″ cardstock; Vellum the same size as your cardstock - optional to add a diffusing layer inside. Plain copy paper works, too, if you're using 8.5″ x 11″ cardstock! Double sided tape-OR-; Good quality glue, like Bearly Precision Art Craft Glue
Follow this instructional video to learn how to create your own paper lantern! The Lantern Festival marks the final day of the traditional Chinese New Year c...
Cut 1 Sheet of Paper in Half. First, select which color or pattern of your craft paper you want to be on the inside of the lanterns and which you want to be on the outside. Cut both sheets of paper to 12 inches by 12 inches if they aren't that size already. Next, fold your sheet of paper for the inside of the lanterns in half, unfold it, and ...
Material Required: Paper lantern, tissue paper (all the 7 colors of a rainbow), glue; Description: If you love the monsoon season then this rainbow DIY paper lantern is the perfect choice . Your fondness of monsoon will be an impetus to make this DIY paper lantern. Now, you can have the feel of the monsoon throughout the year. No need of waiting.
Assemble the lanterns. Fold the side pieces so they form a box. Glue the two pieces together at the tabs. I love hot glue for all my paper crafts. It will dry fast and hold tight on the porous paper. Fold the top of the side pieces so they form a pyramid on the top. Glue the tabs to secure. Now it's time to make the top.
Fold your lantern on the score lines between each pane. Glue the rice paper or vellum window panes on the inside of your Japanese paper lantern. Glue the folded end tab of the lantern. Fold the lantern in half and press down to set the glue. Open up your Japanese paper lantern so it forms a square when viewed from above.
Paper Lantern How-To Video. I've put together a video for this post to show you how to make the lanterns. It's just easier with paper folding and origami than trying to draw or explain all the folds. One thing to note, be careful what surface you use to fold the lanterns on since some of the oil will come off on your hands and on to the ...
Step 1: Print and cut paper lanterns designs. Print the template on paper, I used sturdy 110lb index card stock such as these. Cut out the leaves and stems, and cut along the lines of the petals, be careful not to cut too much and cut them off. Next, measure the size of your glass and cut the excess paper away. Pin it!
Take your scissors and cut-off the triangles that are sticking-out. You may want to fold the triangles first so you have a guide-fold to cut. You now have an octagon. Fold the octagon into a square: Open up the folds, turn the paper 45 degrees, and fold another square like the one you just did. Open the flaps.
Use the punch to cut about 20 discs from the paper. Step 2: Cut the card stock paper into wide strips for the main body of the lantern, about 6 x18cm (2.5″ x 7″). Cover the side of the card stock with long strips of double-sided sticky tape. Leave the top and bottom edges tape-free. Step 3: Fold the paper disc in half.
Follow these steps to make a simple accordion paper lantern: Take two sheets of tissue paper of the same color and fold them in half. Use a ruler and pencil to mark one-inch intervals along the folded edge. Cut the tissue paper along the marked lines, leaving the folded edge uncut. Unfold the tissue paper and lay it flat.
Leave them in the bowls so that no part of the wet paper strips are touching a surface while they dry. 5. Decorate! Once they're dry, it's time to decorate! But first, take a needle and pop the balloon! Now you have your lantern to work with. Paint on a thick layer of mod podge, then stick your pieces of nature on top.
Fold the template outwards along the line in the middle, crease well, and unfold. Cut out the paper lantern and the handle. Fold the paper lantern in half and cut along the vertical lines. Put glue on the tabs, fold your lantern into a circular shape, and stick the edges together. Finally, glue the handle on the paper lantern and let it dry.
Learn how to make a simple and easy origami paper lantern step by step.For more Origami / Paper Folding Craft Ideas, Videos & Tutorials,SUBSCRIBE to: http://...
Learn how to make an easy paper lantern with our printable templates.Download them for free here: https://www.printablesfairy.com/how-to-make-paper-lantern/W...
Cut a 2 ½ inch strip of yellow paper down the long side of the paper. Fold this in half and cut small snips into the paper close together- cutting from one edge to about ½ inch from the other edge of the paper. This will be the fringe. Place glue along the ½ inch side that is not clipped.
Cut a 6 to 8 foot section (depending on how high you want the arch to be) of the flexible copper pipe using wire cutters, pipe cutters or a hack saw. Use your hands to bend it into a half circle shape. Don't worry if it's not perfectly round. You won't notice the wiggles after the paper lanterns have been attached.
Step 3: Assemble your paper star lantern. A. Prefold each dashed angle of each of the five paper star lantern pieces, including the long side tab. B. Prefold the bottom of the two tabs in the opposite direction from how you folded it in step A. Be sure to fold all five pieces in the same manner. C.
Creating A DIY Paper Lantern. Begin by laying out your chopsticks or wooden dowels in the shape of a rectangle and securing the corners with hot glue to hold them together. Cut a napkin or paper ...
Depending on the shape and size of the lantern, cut panels out of the paper, but always make them bigger. They will need to overlap. Step 6. Glue the top end of the paper to the top of the lantern. Stretch it over the tiers and glue it to the bottom of the lantern. Do the same to the next paper panels and overlap each one slightly to avoid gaps.